Azure Provider Overview
The officially supported Nitric Azure Provider.
provider: nitric/azure@latest
See the Overview page for general information on Nitric Pulumi providers.
Nitric runs services (APIs, Schedules and Topic Subscribers) on Azure Container Apps, which is unavailable in a small number of regions.
The Azure provider is supported by the Nitric SDKs and CLI by default. However, credentials for an Azure account will be required when using the up command from the CLI.
Azure Credentials
The Nitric CLI uses the standard Azure credentials to authenticate with Azure. If you've set up local credentials for the Azure CLI or an SDK previously, these settings should work without modification.
If you're setting up your credentials for the first time, simply run azure login command and finish the login via your browser.
az login
Verify the Azure CLI install -
az -v
See Azure documentation for full details on credentials and configuration.
Azure CLI Installation
Installing the Azure CLI assists with credentials setup. You can install it using these summarized instructions, for more options see the Microsoft docs.
Download & install the Azure CLI.
Locating deployed resources
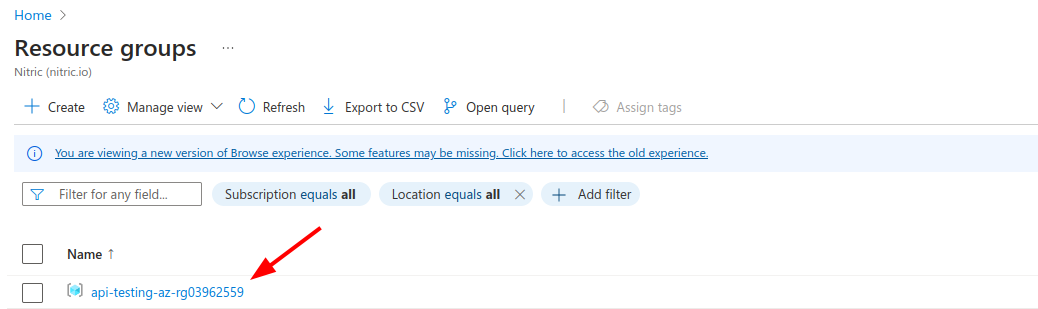
This Nitric Azure provider deploys resources for a stack into a resource group dedicated to that stack. You can either use one your already have by configuring it in the stack configuration or let Nitric create one for you.
Once a stack has been deployed to Azure it's resource group should be present in the Resource groups page of the portal. Assuming it was deployed to a subscription you have access to.
Resource groups are conventionally named <project-name>-<stack-name>-<randomId>
In this example the project name is api-testing and the stack name is az.
More recent versions of the Nitric Azure provider display a direct link to the resource group in output from nitric up.
Example:
Resource Group:──────────────https://portal.azure.com/#@your-tenant-id/resource/subscriptions/your-subscription-id/resourceGroups/your-resource-group/overviewAPI Endpoints:──────────────main: https://example-api865cb.azure-api.net
Stack Configuration
# The provider to use and it's published version# See releases:# https://github.com/nitrictech/nitric/tagsprovider: nitric/azure@latest# The target Azure region to deploy to# See available regions:# https://azure.microsoft.com/en-us/explore/global-infrastructure/products-by-region/?products=container-appsregion: my-azure-stack-region# Deploy into an existing resource group# Available since v1.11.0# ⚠️ Changing this property post-deployment is a destructive operationresource-group: my-azure-resource-group# Org to associate deployed API Management services withorg: example-org# Admin email to associate deployed API Management services withadminemail: test@example.com# All configuration below is optional# Apply configuration to nitric APIsapis:# Target an API by its nitric namemy-api:# provide domains to be used for the apidescription: An Azure API# Add CDN configuration, required for custom domains for website deployments# Available since v1.19.4cdn:# The name of the Azure DNS Zone to use when configuring the website DNSzone-name: example.com# The resource group name of the DNS Zone you configured in Azure DNS Zoneszone-resource-group: yourzone-rg# A valid domain or subdomain for the DNS Zone to use for the deployed websites endpointdomain-name: app.example.com# Skip CDN cache invalidation during deployments (defaults to false)skip-cache-invalidation: true# Configure your deployed servicesconfig:# How services without a type will be deployeddefault:# configure a sample rate for telemetry (between 0 and 1) e.g. 0.5 is 50%telemetry: 0# configure services to deploy to Google Cloud Run# see: https://learn.microsoft.com/en-us/azure/container-apps/containers#configurationcontainerapps: # Available since v0.26.0# set 1/4 vCPUcpu: 0.25# set 0.5GB of RAMmemory: 0.5# The minimum number of instances to scale down tomin-replicas: 0# The maximum number of instances to scale up tomax-replicas: 10# Additional deployment types# You can target these types by setting a `type` in your project configurationbig-service:telemetry: 0containerapps:memory: 1min-replicas: 2max-replicas: 100
Websites
When deploying websites, Nitric will create a Front Door Endpoint that automatically provides a public URL for your website. This URL is not suitable for production use, and you should configure a custom domain for your website.
The DNS Zone used to configure the custom domain must be created in Azure DNS Zones before deploying with your custom domain configuration.
- Purchase/Register a domain name with your domain registrar of choice.
- Navigate to https://portal.azure.com/#browse/Microsoft.Network%2FdnsZones in your Azure Portal
- Click
Create - Select your subscription and resource group (or create a new one)
- Enter a
Nameof your choice, this should be the domain name you purchased i.e. example.com - Click
Review + Create - Click
Create - Once the DNS Zone is created, click on the
Go to resourcebutton
Now that the DNS Zone is created, you need to configure your registrar (domain) or existing DNS (subdomain) to point at the new name servers created for the zone.
The configuration details are available on the Essentials tab within the DNS Zone page. This step is different depending on your chosen domain registrar. Below are some general steps depending on whether your configuring the primary domain or a subdomain.
Domain
Your registrar (e.g. Namecheap, GoDaddy, Cloudflare, etc.) will allow you to change the name servers for you domain, sometimes this is called 'Custom DNS'. Add each of the name servers (NS records) from the Registrar setup dialog in the relevant config page for your registrar.
Subdomain
If you're configuring a subdomain e.g. app.yourdomain.com, you can simply add the NS records to your existing DNS configuration for the chosen subdomain. Typically, the config will look something like this:
Host and Nameserver| Record Type | Host | Nameserver |
|---|---|---|
| NS Record | app | ns1-06.azure-dns.com |
| NS Record | app | ns2-06.azure-dns.net |
| NS Record | app | ns3-06.azure-dns.org |
| NS Record | app | ns4-06.azure-dns.info |
Stack file configuration
Now that you have your DNS Zone created and Nameservers configured you can add the relevant config to your GCP stack file.
# Add to your stack filecdn:# The name of the Azure DNS Zone to use when configuring the website DNSzone-name: example.com# The resource group name of the DNS Zone you configured in Azure DNS Zoneszone-resource-group: yourzone-rg# A valid domain or subdomain for the DNS Zone to use for the deployed websites endpointdomain-name: app.example.com
Have feedback on this page?
Open GitHub Issue