Integrating Twilio with Nitric
What we'll be doing
In this guide we'll use the Nitric Framework with Twilio to build a serverless API that can send SMS to users.
Getting Started
Create a Project
Create a new project using:
nitric new nitric-twilio ts-starter
This will scaffold the project ready for defining your API.
Create a Twilio Account
To integrate with Twilio, it's important to create a Twilio account. If you don't already have an account, there's an option to start a free trial here. This trial doesn't ask for any payment details and provides a decent amount of free credits.
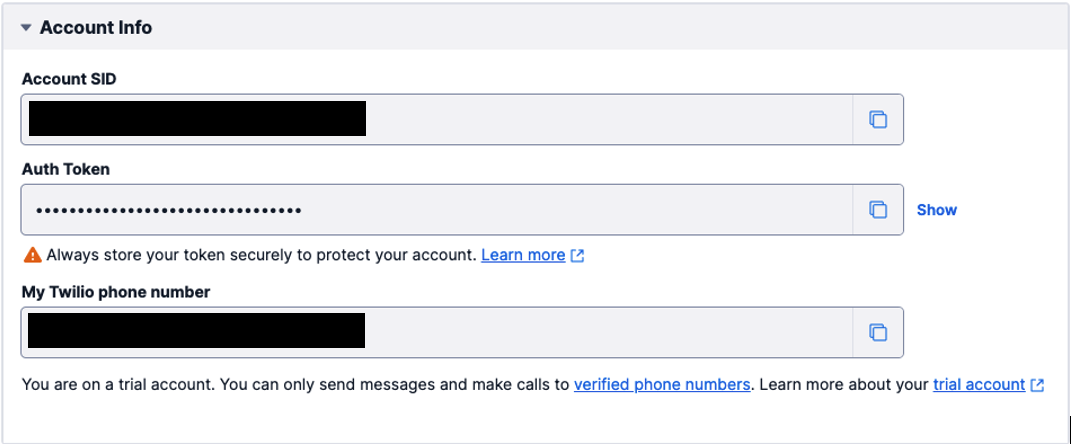
Once you've gone through the account creation and verification, you'll arrive at the dashboard. There is a section which contains the API credentials. These are used to connect to the Twilio API so keep them in mind.
Create the Messenger Class
The messenger class acts as a helper wrapper for sending text messages. It accepts the account SID and the auth token and creates a client. This client is then used in the single method send which accepts a text message object and creates it.
import twilio, { Twilio } from 'twilio'class Messenger {private client: Twilioconstructor(twilioAccountSID: string, twilioAuthToken: string) {this.client = twilio(twilioAccountSID, twilioAuthToken)}async send(text): Promise<string> {try {const message = await this.client.messages.create(text)return `${message.dateCreated}: Successfully sent text message`} catch (err) {return `An error occured: ${err}`}}}export default Messenger
You will need to add the twilio module using your preferred package manager.
npm install twilio
Create the API
For the API we will have a single POST route send. This done by creating an API resource using the Nitric SDK and defining a new route.
import { api } from '@nitric/sdk'const textApi = api('text')textApi.post('/send', async (ctx) => {})
The next step is pulling the environment variables in and constructing our messenger. We will use the dotenv module.
npm install dotenv
We can create a .env file in root of the project with the twilio API information that's sitting on your Twilio dashboard.
TWILIO_ACCOUNT_SID=14f7e9a0b95d11ec84220242ac120002TWILIO_AUTH_TOKEN=6f20cb2ae2764be8b615d6fad4accec4TWILIO_PHONE_NUMBER=+1234567890
The dotenv.config call will load the variables from the .env file into the process.env object. You can then use the variables to construct the messenger.
import { api } from '@nitric/sdk'import Messenger from '../common/messenger'require('dotenv').config()const textApi = api('text')const twilioAccountSID = process.env.TWILIO_ACCOUNT_SIDconst twilioAuthToken = process.env.TWILIO_AUTH_TOKENtextApi.post('/sendMessage', async (ctx) => {const messenger = new Messenger(twilioAccountSID, twilioAuthToken)})
We'll fill in the logic for the route. First, pull the data from the POST request. This data will look like so:
{"to": "+16505130514","message": "Test Message from Twilio!"}
And can be extracted from the context like this:
const { to, message } = ctx.req.json()
Secondly, convert this data to an SMS object:
{to,body: message ?? '',from: process.env.TWILIO_PHONE_NUMBER}
Finally, putting all these components all together, we get a functional text messaging endpoint ready for testing:
textApi.post('/send', async (ctx) => {const messenger = new Messenger(twilioAccountSID, twilioAuthToken)const { to, message } = ctx.req.json()const resp = await messenger.send({to,body: message ?? '',from: process.env.TWILIO_PHONE_NUMBER,})ctx.res.body = respreturn ctx})
Test the API
This API can easily be tested using the local Nitric dev environment. This is started with the following command:
nitric start
We can then use a tool like postman or curl to test the endpoint.
curl -X POST -d '{"to":"+16505130514", "message": "Test Message from Twilio!"}' http://localhost:4001/send
If everything has been set up correctly, and the 'to' field on the JSON request body is replaced with a phone number you own, you will get a text that looks something like:
Sent from your Twilio trial account -Test Message from Twilio!
Thats it! If you want to deploy the API you can use our deployment docs.