APIs with PlanetScale, Prisma and Nitric
What we'll be doing
In this guide we will create an API using serverless services, then use PlanetScale and Prisma for data persistence. We will then deploy the application to the cloud of your choice, AWS, GCP, or Azure.
To keep things light, the API we'll create generates memes by allowing uploads of image templates, then generating new images with overlaid text. Feel free to adapt the steps for any other API you'd like to build.
For image editing, we used a library from NPM called jimp, but you could use anything else you like.
When you're done, you'll have an API which accepts a template image and can generate multiple memes from it.
Prerequisites
To complete this guide, here are things you'll need setup ahead of time:
- An account with PlanetScale it's free
- Node.js
- The Nitric CLI
- (optional) Your choice of an AWS, GCP or Azure account
Getting started
Let's start with a new Nitric project and select the TypeScript starter template:
# create the projectnitric new api-guide ts-starter# navigate to the new project directorycd api-guide# install dependenciesnpm install
Once you have the project, you can run it locally to check that everything is working correctly:
nitric start
The example app contains a hello world style example service. Once it's running you can test it with an HTTP request:
curl http://localhost:4001/hello/JohnHello John
Since we won't use the example function you can delete the services/hello.ts
file.
Since we'll also use Jimp later for image editing, let's install that now too:
npm install jimp
Database and schema setup
Next, you'll need a PlanetScale database. If you have an account already, skip to the next step. Otherwise, you can sign up for a free account.
Create the database
You can create a new database with the PlanetScale CLI or through the web dashboard.
Here is an example using the CLI:
pscale database create planetnitric --region us-east
You can pick a different region for you database if you prefer, see: available regions
Prisma setup
Now you're ready to setup Prisma, let's start by adding it to our project with npm:
npm install --save-dev prisma @prisma/client
Then, we can initialize Prisma and generate our first schema file:
npx prisma init
This gives you a new prisma schema in a folder called prisma and a new .env file containing config we'll use to connect to our PlanetScale database.
Building the schema
Overwrite the contents of prisma.schema with the schema below. We'll use this to initialize our database.
// This is your Prisma schema file,// learn more about it in the docs: https://pris.ly/d/prisma-schemagenerator client {provider = "prisma-client-js"binaryTargets = ["linux-musl"]output = "./client"}datasource db {provider = "mysql"url = env("DATABASE_URL")relationMode = "prisma"}model MemeTemplate {name String @id @uniquecreatedAt DateTime @default(now())textPositions TextPosition[]Meme Meme[]}model TextPosition {id String @id @default(cuid())name StringmemeId StringposX IntposY Intwidth Intheight Inttemplate MemeTemplate @relation(fields: [memeId], references: [name], onDelete: Cascade)@@index([memeId])}model Meme {id String @id @default(cuid())createdAt DateTime @default(now())templateId Stringtemplate MemeTemplate @relation(fields: [templateId], references: [name], onDelete: Cascade)@@index([templateId])}
Next, let's generate the prisma client from the schema:
npx prisma generate
Finally, let's make it easy to import an instance of the prisma client by creating the file prisma/index.ts and adding this code:
import { PrismaClient } from './client'export * from './client'let prisma: PrismaClientif (process.env.NITRIC_ENVIRONMENT !== 'build') {if (process.env.NODE_ENV === 'production') {prisma = new PrismaClient({errorFormat: 'minimal',})} else {globalThis['prisma'] =globalThis['prisma'] ||new PrismaClient({errorFormat: 'pretty',})prisma = globalThis['prisma']}}export default prisma
Connecting to PlanetScale
Now our schema is ready, let's get Prisma connected to PlanetScale. The easiest method is to use the connect button in the PlanetScale dashboard and select Prisma from the dropdown. This will give you values you can copy into the .env for your project.
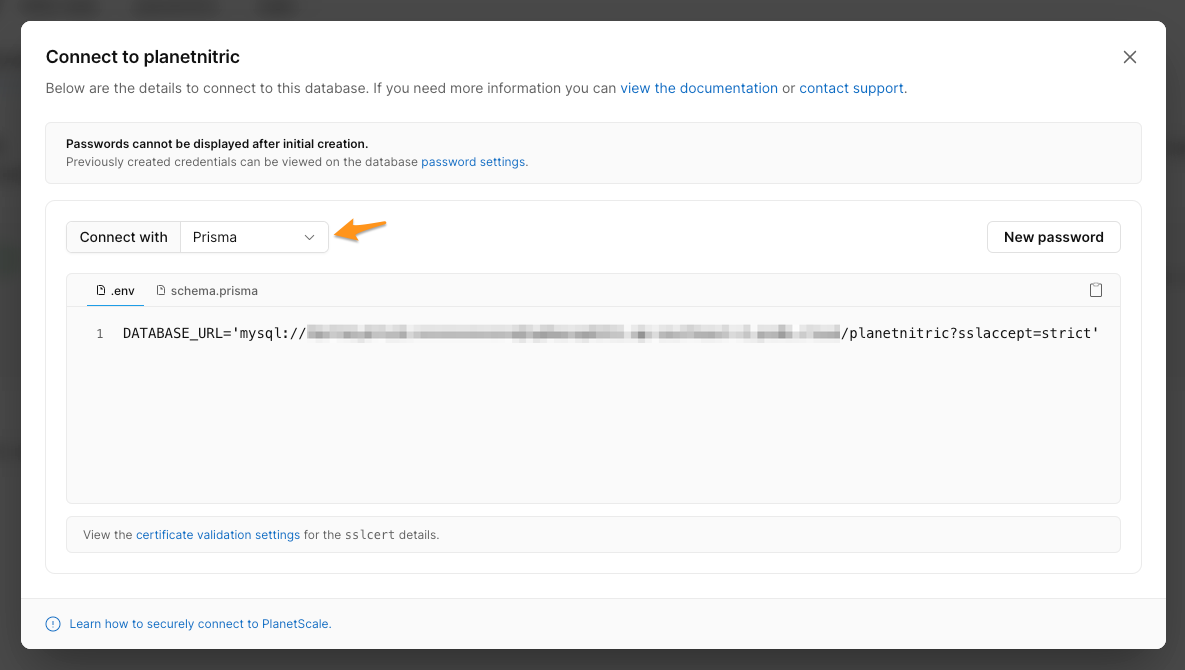
When you're done, the .env file will look something like this:
DATABASE_URL='<Your URL from the above screenshot>'
With the schema available and the connection details configured, you can push the Prisma schema to PlanetScale:
npx prisma db push
Add cloud resources to our application
Apps built with Nitric define their resources in code, you can write this in the root of any .js or .ts file. To keep things organized, we recommend grouping resources together. So, let's start by defining the resources we'll need to support our API in a new resources directory.
First, let's declare an API gateway. Create a new file called apis.ts in a new folder called resources and this code:
import { api } from '@nitric/sdk'export const memeApi = api('meme')
This creates a new api resource with the name "meme" and exports it as a resource that can be referenced elsewhere in the project.
Next, let's also create some buckets to store our meme image files. Create a new file called buckets.ts under resources and populate it with the following:
import { bucket } from '@nitric/sdk'export const templates = bucket('templates')export const memes = bucket('memes')
Again, we're declaring new resources, buckets in this case, and giving them unique names within the app. We export those resources so they can be referenced again without being declared repeatedly.
Create the meme template service
Now that the resources are declared, let's create the first service. This service allows API consumers to register new meme templates by providing a base image for memes and a configurable set of text locations.
In the /services directory create a new file called templates.ts and populate it with the following code:
import Jimp from 'jimp'import prisma, { MemeTemplate, TextPosition } from '../prisma'import { memeApi } from '../resources/apis'import { templates } from '../resources/buckets'export interface CreateTemplateRequestextends Omit<MemeTemplate, 'filepath' | 'createdAt'> {source: stringtextPositions: Omit<TextPosition, 'id' | 'memeId'>[]}const templateImgs = templates.allow('write')export const normalizeName = (name: string) => {return name.replace(' ', '-').replace(/[^\w-]*/g, '')}// POST: /templates - Create new meme templatesmemeApi.post('/templates', async ({ req, res }) => {const {textPositions,source,name: rawName,} = req.json() as CreateTemplateRequestconst name = normalizeName(rawName)const img = await Jimp.read(source)try {const template = await prisma.memeTemplate.create({data: {name,textPositions: {create: textPositions,},},})// Limit width to 512px max to save spaceconst resizeFactor = 512 / img.getWidth()img.resize(img.getWidth() * resizeFactor, img.getHeight() * resizeFactor)// store the image in the bucketconst buf = await img.getBufferAsync(img.getMIME())await templateImgs.file(name).write(buf)res.json(template)} catch (e) {res.status = 409res.body = `Name already taken: ${name}: ${e.message}`}})// GET: /templates - List all meme templatesmemeApi.get('/templates', async ({ res }) => {const memeTemplates = await prisma.memeTemplate.findMany({include: {textPositions: true,},})res.json(memeTemplates)})
In this example we're importing the API gateway memeApi we created in our resources directory, and registering route and method handlers using methods like get and post, much like you would in frameworks such as Express.
Additionally, we're importing the bucket used to store template images templateImages from the resources directory. We also declare our intended use of the bucket with the for method, which lets Nitric know what permissions your code needs and applies them during deployments. In this instance we're only giving our template service write access to the templates bucket.
The incoming context object (which has been destructured into req and res) contains request and response details like path params, query params, headers, body, status, etc.
Create the meme service
Similar to the templates example, we'll create another new file services/memes.ts, with the code below:
import Jimp from 'jimp'import prisma, { Meme } from '../prisma'import { memes, templates } from '../resources/buckets'import { memeApi } from '../resources/apis'interface MemeCreationRequest extends Omit<Meme, 'id' | 'templateId'> {templateName: stringtexts: {name: stringvalue: string}[]}const templateImgs = templates.allow('read')const memesImgs = memes.allow('read', 'write')// POST: /memes - Create new meme imagesmemeApi.post('/memes', async ({ req, res }) => {const meme = req.json() as MemeCreationRequestconst template = await prisma.memeTemplate.findFirst({include: {textPositions: true,},where: {name: {equals: meme.templateName,},},})const imgBytes = await templateImgs.file(template.name).read()// Load the image and fontconst [img, font] = await Promise.all([Jimp.read(Buffer.from(imgBytes)),Jimp.loadFont(Jimp.FONT_SANS_32_WHITE),])// Apply text to the template image to create the memememe.texts.forEach((text) => {// get the text templateconst matchingText = template.textPositions.find((tp) => tp.name === text.name,)if (!matchingText) return// ignore if anchor tags don't matchimg.print(font,img.getWidth() * (matchingText.posX / 100),img.getHeight() * (matchingText.posY / 100),{text: text.value,alignmentX: Jimp.HORIZONTAL_ALIGN_CENTER,alignmentY: Jimp.VERTICAL_ALIGN_MIDDLE,},img.getWidth() * (matchingText.width / 100),img.getHeight() * (matchingText.height / 100),)})const [newMeme, buf] = await Promise.all([prisma.meme.create({data: {templateId: meme.templateName,},}),img.getBufferAsync(Jimp.MIME_PNG),])await memesImgs.file(newMeme.id).write(buf)res.json(newMeme)})// GET: /memes - List all created memesmemeApi.get('/memes', async ({ res }) => {const memes = await prisma.meme.findMany()return res.json(memes)})// GET: /memes/:id - Get a meme image by it's IDmemeApi.get('/memes/:id', async ({ req, res }) => {const { id } = req.paramsconst signedUrl = await memesImgs.file(id).getDownloadUrl()res.status = 303res.headers['Location'] = [signedUrl]})
Again, this file re-uses the memeApi resource, but defines new routes under the /memes path.
We also request read access to the templateImages bucket and read-write access to the memeImages bucket.
Testing it locally
Now we've got the API established, let's test it out locally.
npm run dev
When running APIs locally, Nitric will sub-route them by their name. So in this example to create a new meme template you'll need to make your POST request to https://localhost:4001/templates.
Here are some example requests you can use to test the API:
Create a meme template
curl -X POST http://localhost:4001/templates \-H 'Content-Type: application/json' \-d '{"name":"my-meme","source":"https://www.meme-arsenal.com/memes/89f28a7e83e28f15b1d8e560c788b4fc.jpg","textPositions":[{"name":"topText","posX":50,"posY":0,"width":50,"height":50},{"name":"bottomText","posX":50,"posY":50,"width":50,"height":50}]}'
Full Request Body
{"name": "my-meme","source": "https://www.meme-arsenal.com/memes/89f28a7e83e28f15b1d8e560c788b4fc.jpg","textPositions": [{"name": "topText","posX": 50,"posY": 0,"width": 50,"height": 50},{"name": "bottomText","posX": 50,"posY": 50,"width": 50,"height": 50}]}
For source provide a URL hosting a meme template image in a common format
like .png or .jpg
Create a new meme using the template
curl -X POST http://localhost:4001/memes \-H 'Content-Type: application/json' \-d '{"templateName":"my-meme","texts":[{"name":"topText","value":"top text content"},{"name":"bottomText","value":"bottom text content"}]}'
Full Request Body
{"templateName": "my-meme","texts": [{"name": "topText","value": "top text content"},{"name": "bottomText","value": "bottom text content"}]}
Retrieve the image
Using the Meme ID returned from the previous request, open a browser and navigate to http://localhost:4001/memes/[id].
Deploy to the cloud
If you're ready, you can deploy this project to AWS, Azure or Google Cloud.
Start by defining a stack. Stacks are essentially named deployment targets, which represent instances of your application running in the cloud.
You can create a new stack by running nitric stack new and following the prompts.
nitric stack new
Finally, run the up command to deploy the stack and push your code to the cloud:
nitric up
You can use the URL returned from the up command to make requests to your newly deployed API. Then, when you're done, you can destroy the stack with the down command:
nitric down
Have feedback on this page?
Open GitHub Issue