Nitric SQL Databases with Drizzle
This guide demonstrates how to use Drizzle ORM with Nitric's SQL database feature. For this guide we will be creating a to-do app. The finished source can be found here.
SQL databases are currently in preview and only support PostgreSQL deployed to AWS.
Create a new nitric project
The first step is to create a new Nitric TypeScript project using the Nitric CLI.
nitric new todo-app ts-starter
Enabling SQL databases
SQL databases are currently in Preview. To enable this feature in your project add the following to your nitric.yaml file
preview:- sql-databases
Ensure your CLI is at least v1.42 and your AWS provider is at least v1.6.2.
Install Drizzle Kit, Drizzle ORM and postgres
npm i drizzle-orm postgresnpm i -D drizzle-kit
We install drizzle-orm for database interactions, postgres for database management, and drizzle-kit as a dev-dependency for configuration and migrations.
Create a Nitric SQL Database and Connect Drizzle ORM to it
import { sql } from '@nitric/sdk'import { type PostgresJsDatabase, drizzle } from 'drizzle-orm/postgres-js'import postgres from 'postgres'const db = sql('todos', {// points to our custom drizzle migration dockerfilemigrations: 'dockerfile://migrate.dockerfile',})let drizzleClient: PostgresJsDatabaseconst getClient = async () => {// ensure we only create the client onceif (!drizzleClient) {const connectionString = await db.connectionString()const queryClient = postgres(connectionString)drizzleClient = drizzle(queryClient)}return drizzleClient}// export our getClient function, which will be used to get the drizzle client during runtimeexport default getClient
In this snippet, we declare a new database called todos with the sql resource from @nitric/sdk, then we import functionality from postgres and drizzle-orm, connect to the database using Nitric's connection string, and initialize Drizzle.
Add the migrations dockerfile for cloud deployments
# Use an official Node.js runtime as the base imageFROM nodeENV DB_URL=""ENV NITRIC_DB_NAME=""# Copy package.json and package-lock.json into the Docker imageCOPY package*.json ./# Install the application's dependencies inside the Docker imageRUN npm ci# Copy the rest of the application into the Docker imageCOPY . .# Build the Prisma clientRUN npm run drizzle-kit generate# Run the migrations and start the application when the Docker container starts# We define the entrypoint like this so we can correctly copy it out when running it# in the various clouds (e.g. AWS Codebuild does not respect ENTRYPOINT and CMD)ENTRYPOINT ["sh", "-c", "npm run drizzle-kit migrate"]
This will be used during deployment to apply migrations using drizzle-kit before any code changes are applied, ensuring no breakages in code due to a schema change.
Setup Drizzle config file
Next, set up the Drizzle configuration. This file, used by Drizzle Kit, contains information about your database connection, migration folder, and schema files. The DB_URL environment variable is used by Nitric during cloud migrations, however during local development we can can add it via a .env file (we will do that later).
import 'dotenv/config'import { defineConfig } from 'drizzle-kit'export default defineConfig({schema: './schema.ts',out: './drizzle',dialect: 'postgresql',dbCredentials: {url: process.env.DB_URL,},})
This configuration file specifies the database schema location, the migration generation path, and the database connection via the connection string.
Declare todos schema
import { integer, text, boolean, pgTable } from 'drizzle-orm/pg-core'export const todo = pgTable('todo', {id: integer('id').primaryKey(),text: text('text').notNull(),done: boolean('done').default(false).notNull(),})
Here we define the todo table with fields id, text, and done, using data types from Drizzle ORM.
Now we’re ready to start developing an API.
Developing the app
Building the API
Delete the services/hello.ts file and create a new one called todos.ts, this will house our APIs.
Let's create some endpoints for creating, retrieving, editing and deleting todo tasks.
import { api } from '@nitric/sdk'import getClient from '../db'import { todo } from '../schema'import { asc, eq, not } from 'drizzle-orm'const mainApi = api('main')// fetch all todos, sorted by their identifiermainApi.get('/todos', async (ctx) => {const db = await getClient()const data = await db.select().from(todo).orderBy(asc(todo.id))return ctx.res.json(data)})// inserts a new record into the todo tablemainApi.post('/todos/:id', async (ctx) => {const { id } = ctx.req.paramsconst { text } = ctx.req.json()const db = await getClient()await db.insert(todo).values({id: parseInt(id),text,})})// updates the text of a todo by its identifiermainApi.patch('/todos/:id', async (ctx) => {const { id } = ctx.req.paramsconst { text } = ctx.req.json()const db = await getClient()await db.update(todo).set({text: text,}).where(eq(todo.id, parseInt(id)))})// toggles the status of a todo to its opposite statemainApi.patch('/todos/:id/toggle', async (ctx) => {const { id } = ctx.req.paramsconst db = await getClient()await db.update(todo).set({done: not(todo.done),}).where(eq(todo.id, parseInt(id)))})// removes a todo by its identifiermainApi.delete('/todos/:id', async (ctx) => {const { id } = ctx.req.paramsconst db = await getClient()await db.delete(todo).where(eq(todo.id, parseInt(id)))})
Start testing with nitric start
Create a .env file with your local database url, so you can develop against it during nitric start. By default this will be:
DB_URL="postgresql://postgres:localsecret@localhost:5432/todos"
Run nitric start to start your local database and apis.
nitric start
With your local database now running, create and run your first migration using the drizzle-kit generate and drizzle-kit migrate commands:
npx drizzle-kit generate --name initnpx drizzle-kit migrate
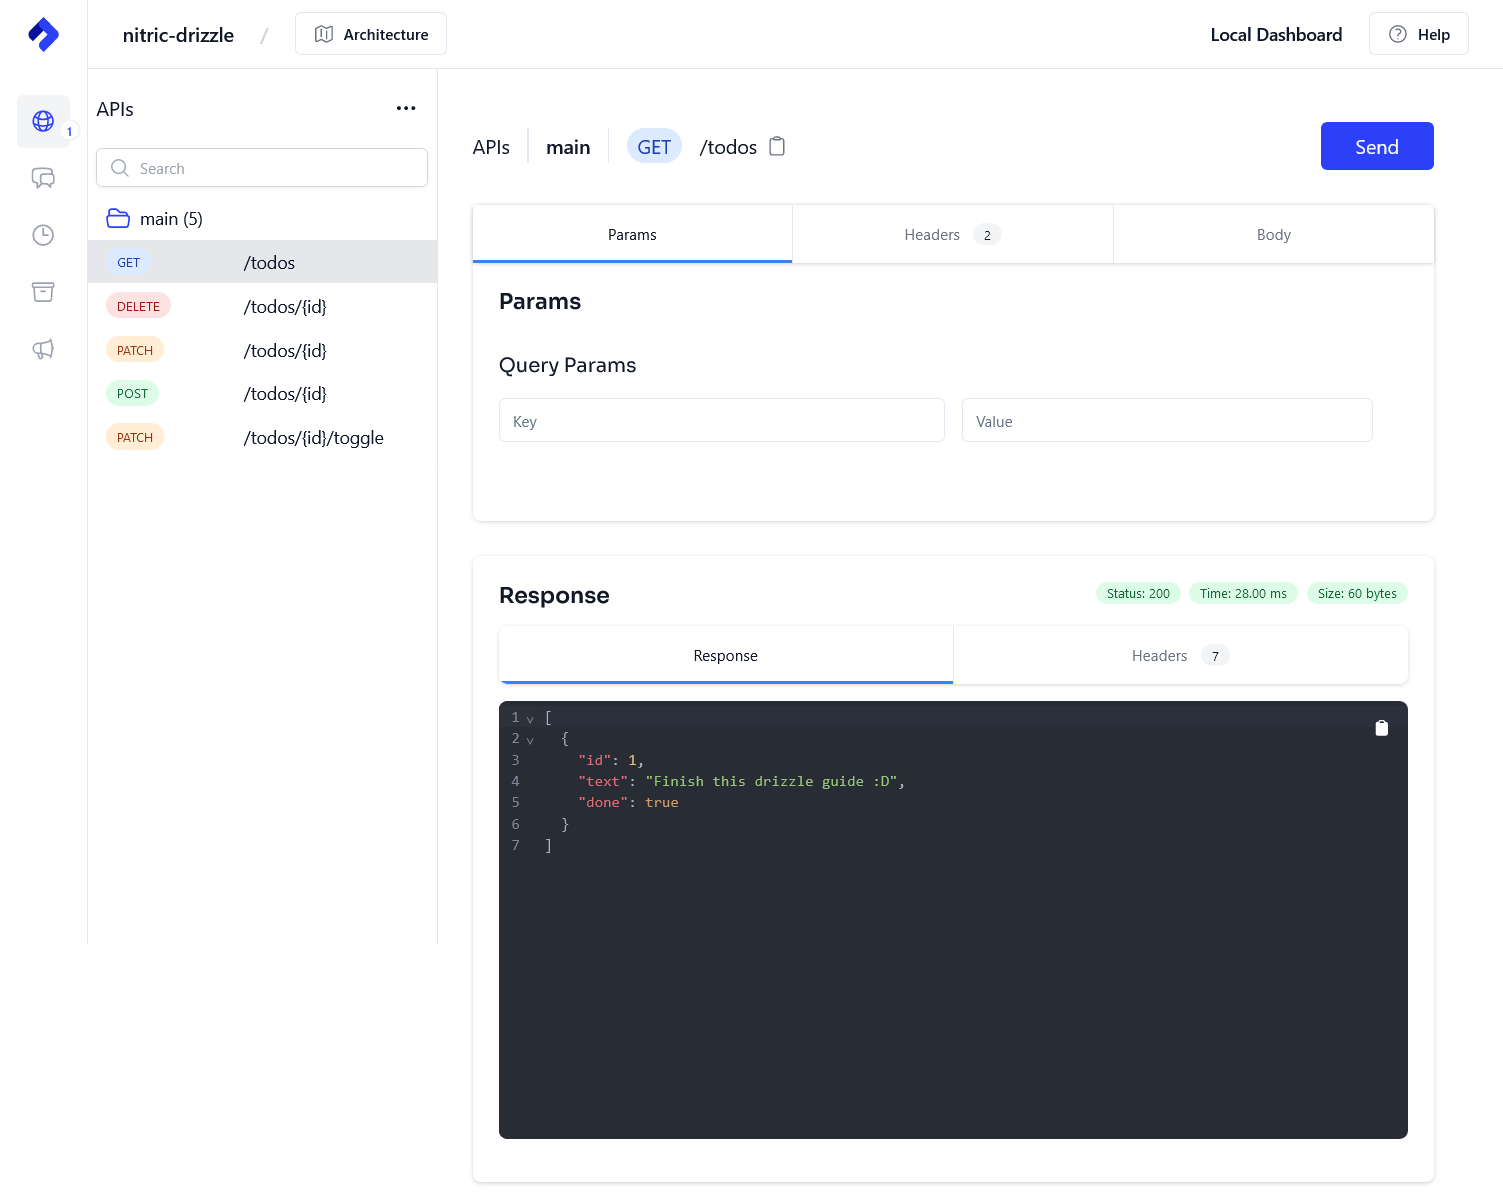
Add some todos using the Nitric dashboard
Open the local dashboard at localhost:49152, then navigate to the POST /todos/{id} endpoint and fill in an id as the path param.
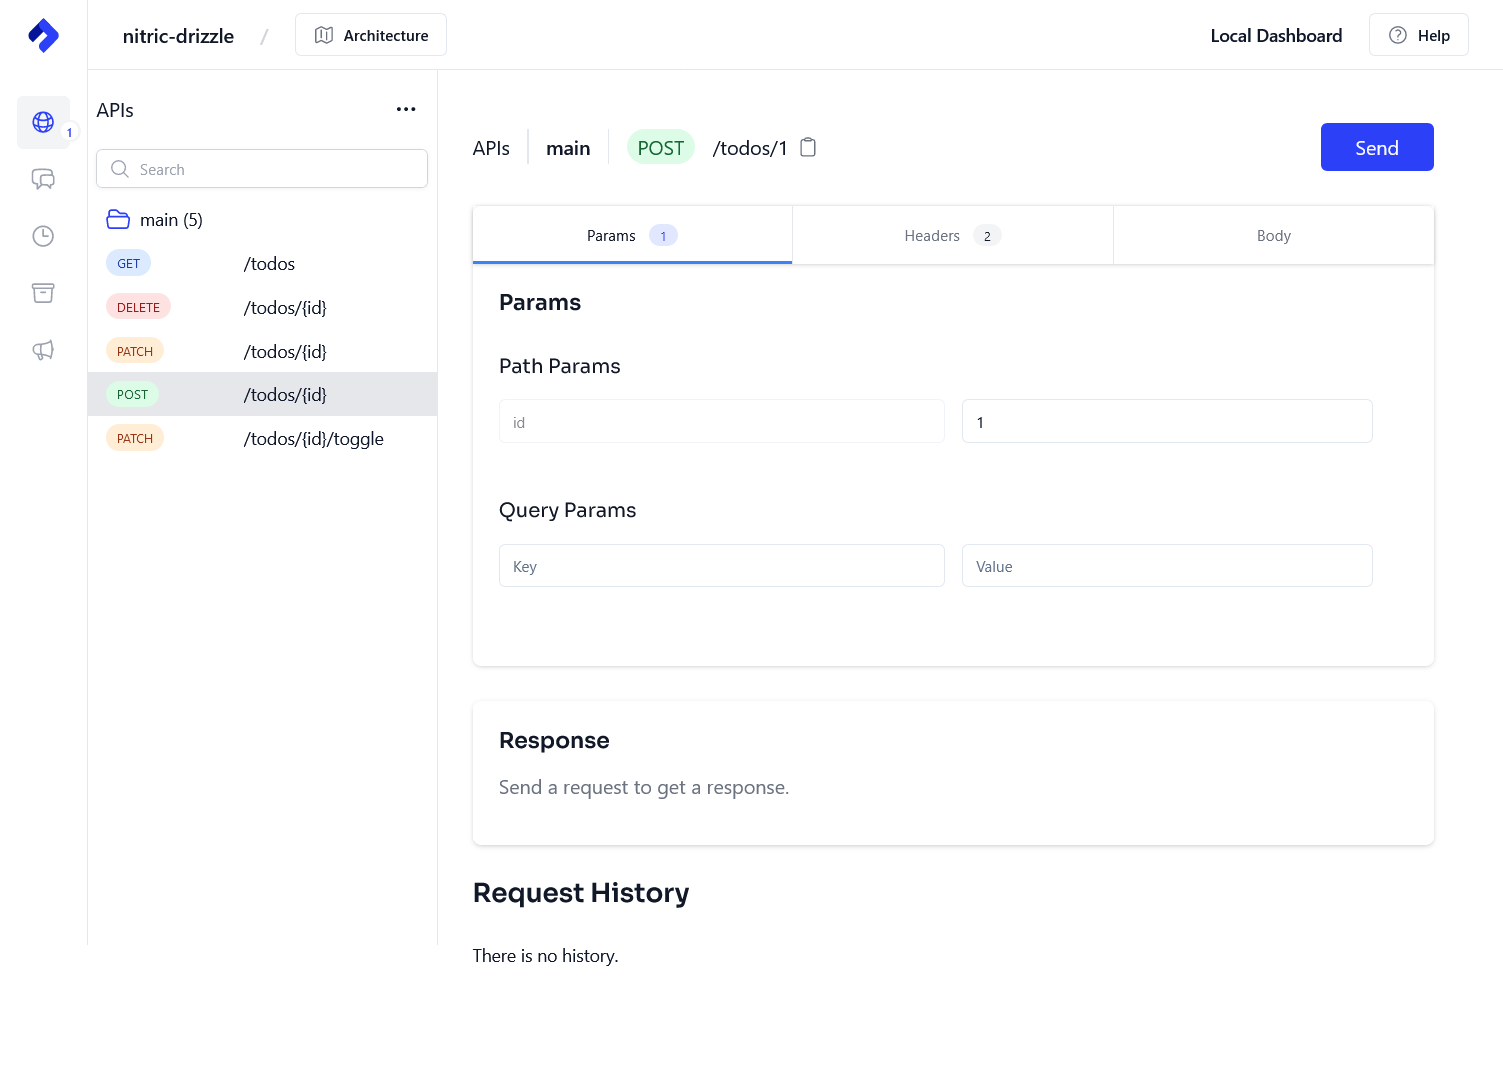
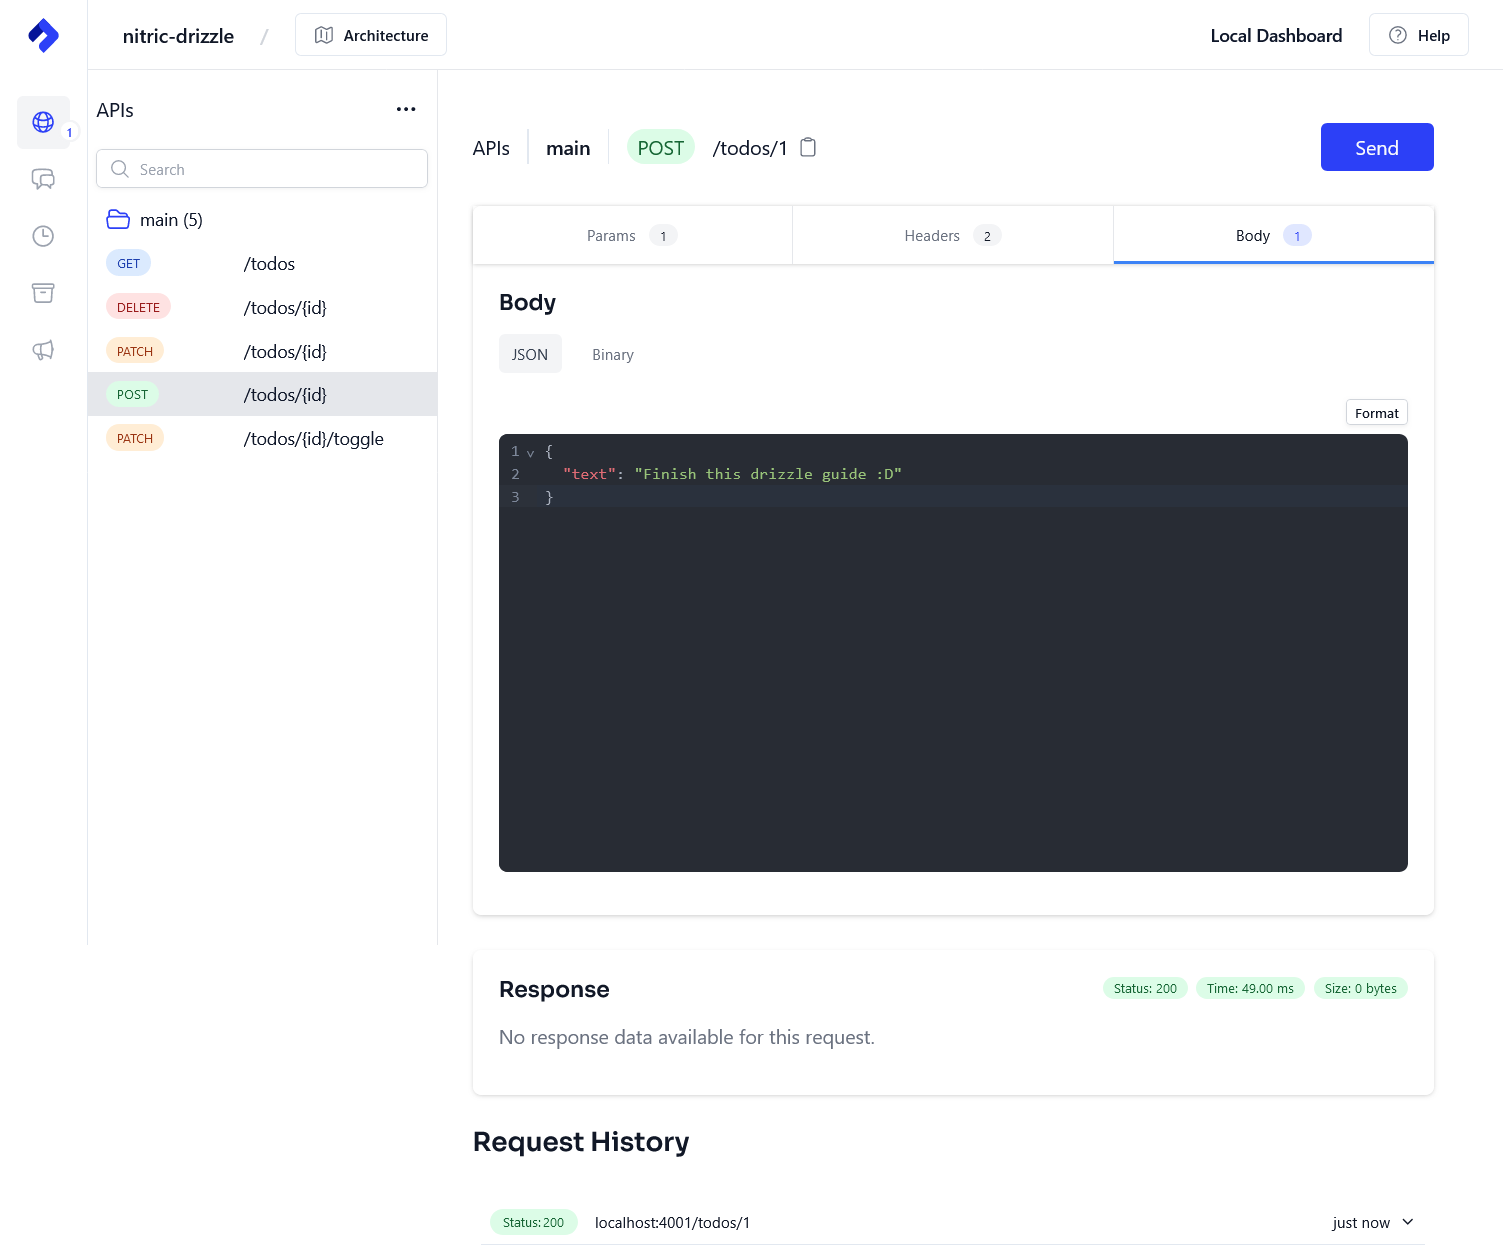
Then add some content to the body of the request, stating the text key and value of the todo task and click send.
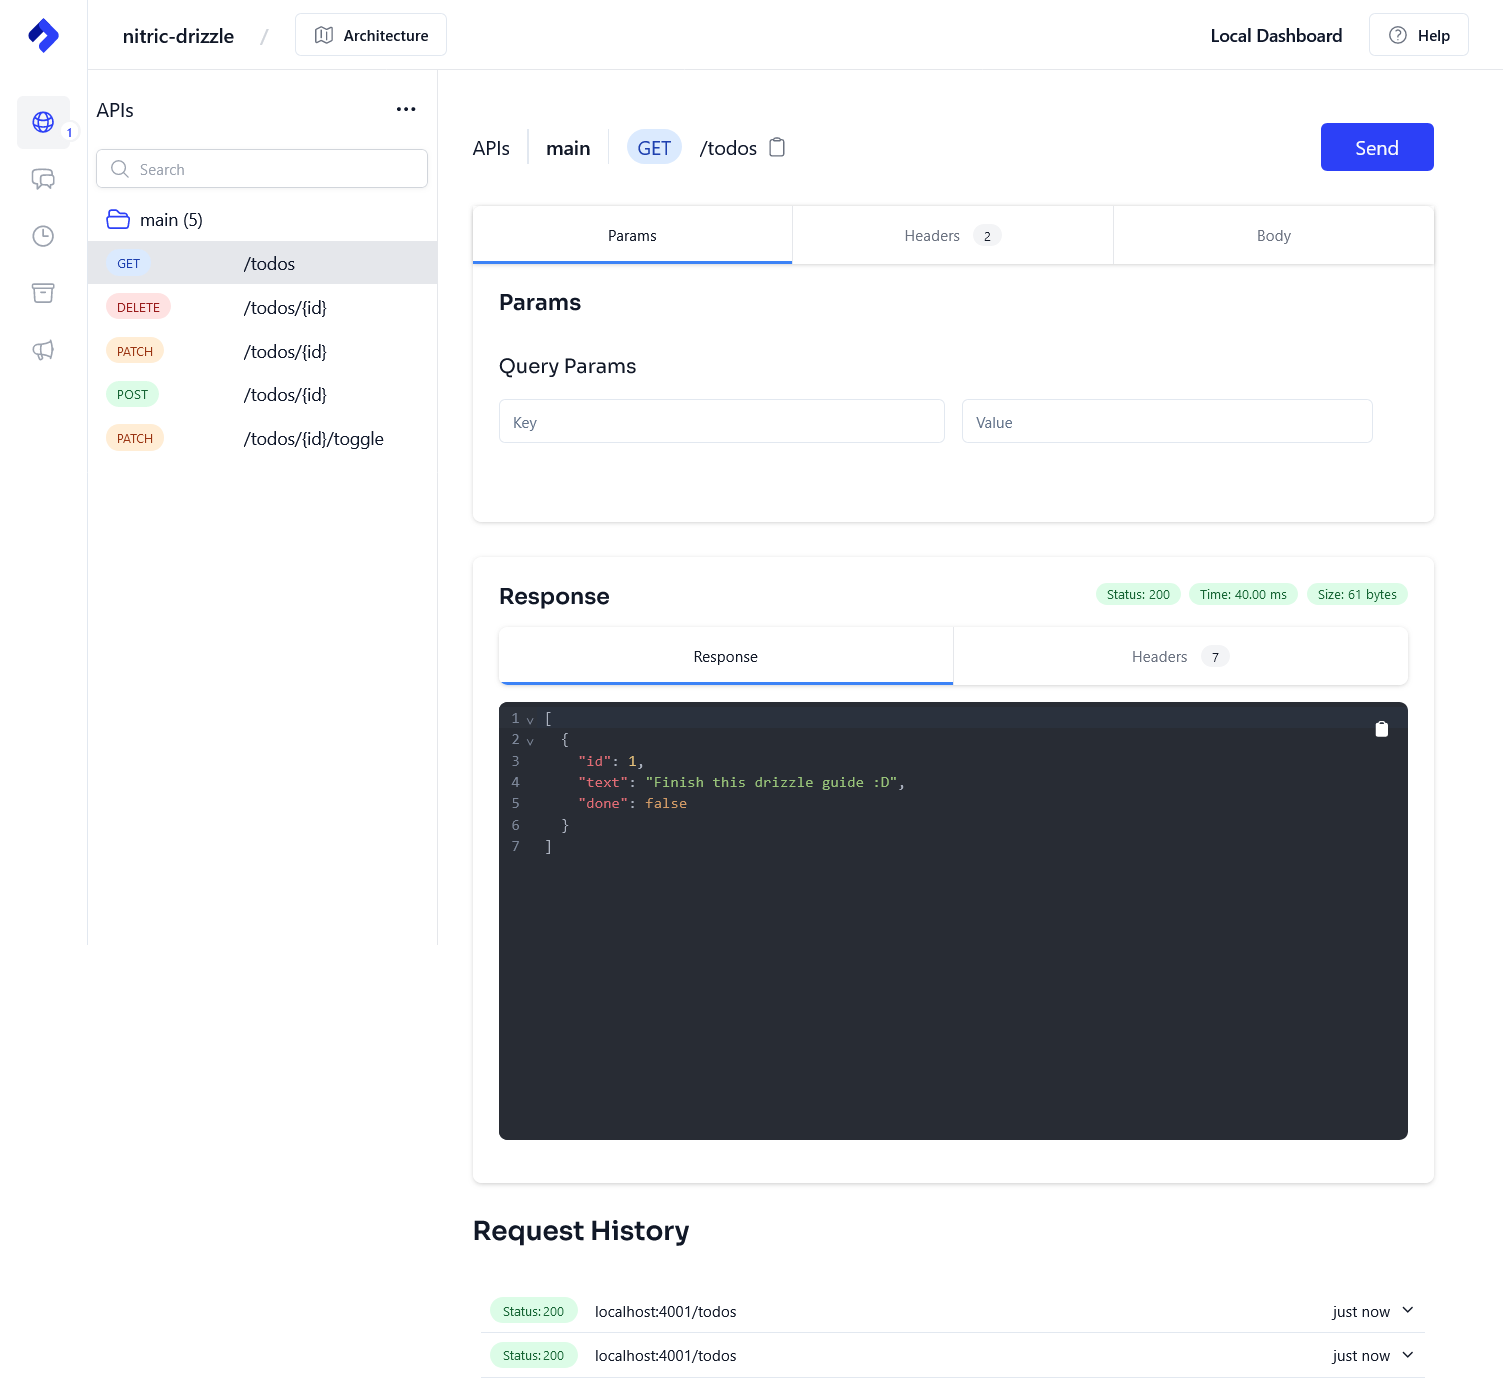
Let's check our todo got created by calling the GET /todos endpoint, which will list all todos.
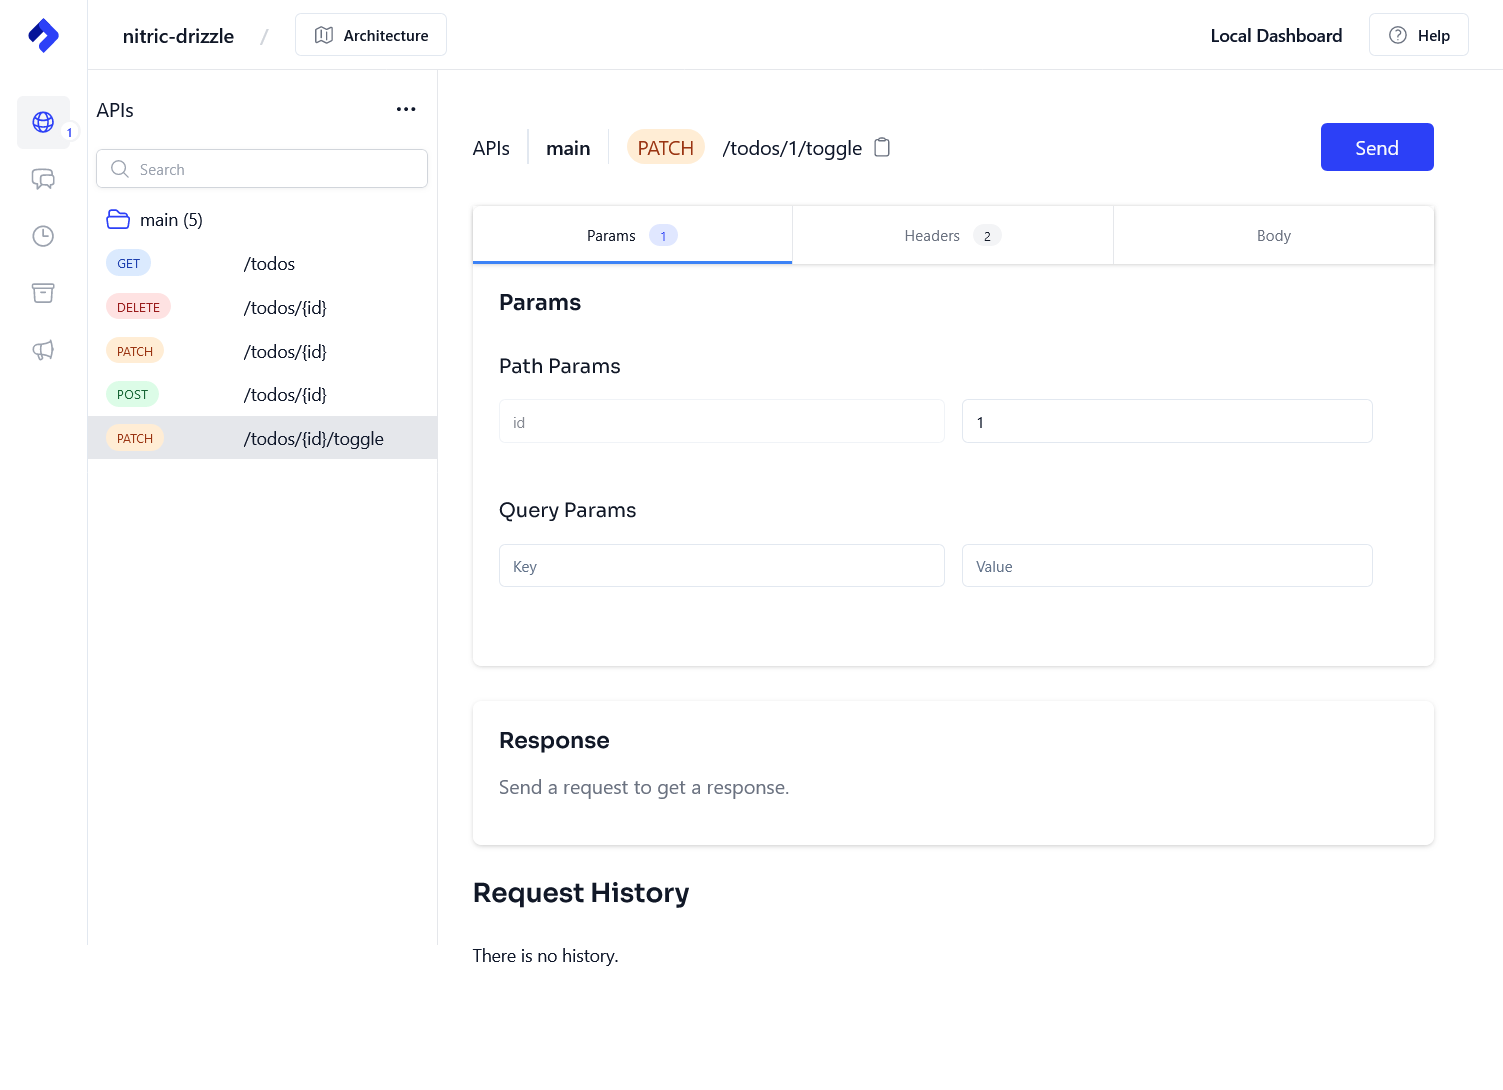
Let's toggle our todo as done, navigate to the PATCH /todos/{id}/toggle and enter the correct id to toggle.
Finally, let's check our todo got toggled to done by calling the GET /todos endpoint.
Feel free to test the other endpoints to update or delete the todo items.
Deploying to AWS
Create your stack
Create a AWS stack called aws-staging for your staging environment.
nitric stack new aws-staging aws
Inside the stack file, ensure you set your region.
# The nitric provider to useprovider: nitric/aws@latest# The target aws region to deploy to# See available regions:# https://docs.aws.amazon.com/general/latest/gr/lambda-service.htmlregion: us-east-2
Deploy
Go ahead and deploy to AWS using the nitric up command. Ensure you have setup your AWS credentials correctly.
nitric up
Tear down
The avoid unwanted costs of running your test app, you can tear down the stack using the nitric down command.
nitric down
Prefer to use a different ORM? We also have these guides:
Have feedback on this page?
Open GitHub Issue