Build an Uptime Monitoring Tool with Nitric
What we'll be doing
In this tutorial, we'll develop an uptime monitoring tool using Nitric APIs, Key Value Stores, Schedules, and Topics. Our tool will add, remove, and monitor sites, sending status notifications to a Discord channel.
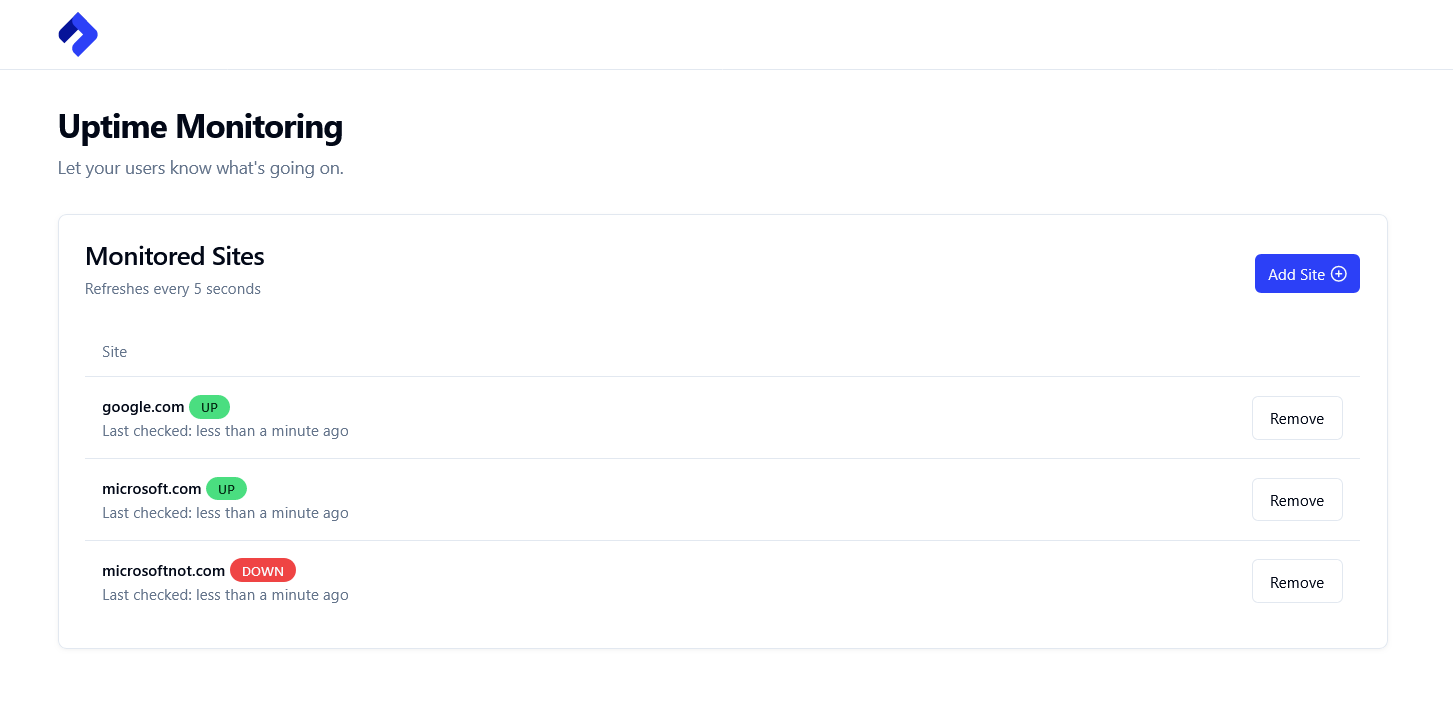
In a hurry? You can view and download the finished application here. The finished application will look like this:
Prerequisites
- Node.js
- The Nitric CLI
- (optional) A Discord server that has a Webhook setup
Getting Started
Begin by cloning the Nitric application using the tutorial-start branch:
git clone -b tutorial-start https://github.com/nitrictech/uptime-monitoring.git uptime
Install backend dependencies:
cd uptimenpm install
Check that the frontend works:
cd frontendnpm installnpm run dev
Then visit http://localhost:4321 to see your Astro frontend. It won't currently work with no backend services, but we will work on that next!
Create service files
Let's create a services directory and create placeholder files for the site, check, and notify services:
mkdir servicestouch services/site.tstouch services/check.tstouch services/notify.ts
Create site service
Let's start by creating a site service that will handle creating, deleting, and retrieving all our sites. To do this, we will use the Nitric API resource.
To help reuse resources across services, let's create a resources folder with a file named index.ts:
mkdir resourcestouch resources/index.ts
Add a Nitric API named public to handle all our requests:
import { api } from '@nitric/sdkexport const publicApi = api('public')
Since we want to interact with our API from the browser, let's add some CORS middleware.
Create a common folder with a file called cors.ts:
mkdir commontouch common/cors.ts
Then add this generic CORS middleware:
import { HttpMiddleware } from '@nitric/sdk'export const corsMiddleware: HttpMiddleware = (ctx, next) => {ctx.res.headers['Access-Control-Allow-Origin'] = ['*']ctx.res.headers['Access-Control-Allow-Headers'] = ['Origin, Content-Type, Accept, Authorization',]ctx.res.headers['Access-Control-Allow-Methods'] = ['GET,POST,DELETE,OPTIONS']return next(ctx)}
And apply the middleware to your API globally:
import { api } from '@nitric/sdk'import { corsMiddleware } from '../common/cors'export const publicApi = api('public', {middleware: corsMiddleware,})
To store our sites let's use Nitric Key Value Stores and set our permissions to set, get and delete. We will also create a TypeScript interface for Site; we can use this for the KV Store and for our Topics later.
import { api, kv } from '@nitric/sdk'import { corsMiddleware } from '../common/cors'export interface Site {url: stringlastChecked: stringup: boolean}export const publicApi = api('public', {middleware: corsMiddleware,})export const sitesStore = kv<Site>('sites').allow('set', 'get', 'delete')
To create the site service, let's start by adding code to the site.ts file.
Add your get, post, delete and options endpoints to the publicApi. We can also finish off the get handler by implementing the getAllSites method, this will simply return all sites in the sitesStore.
import { type Site, publicApi, sitesStore } from '../resources'const getAllSites = async () => {const sites: Site[] = []for await (const key of sitesStore.keys()) {sites.push(await sitesStore.get(key))}return sites}publicApi.post('/sites/:url', async (ctx) => {const { url } = ctx.req.params// TODO Do initial checkconst siteData = {} as Siteawait sitesStore.set(url, siteData)// TODO Publish to site-added topicreturn ctx.res.json(siteData)})publicApi.delete('/sites/:url', async (ctx) => {const { url } = ctx.req.paramsawait sitesStore.delete(url)// TODO Publish to site-removed topicreturn ctx})publicApi.get('/sites', async (ctx) => {return ctx.res.json(await getAllSites())})publicApi.options('/sites/:url', async (ctx) => ctx)
Now we need to handle the actual status check for a site. Let's add a file called status.ts to our common folder:
touch common/status.ts
Add the following code, which performs a GET request against the site URL and checks the response status:
import { Site } from '../resources'export const statusCheck = async (url: string): Promise<Site> => {const now = new Date().toISOString()const formattedUrl =url.startsWith('http:') || url.startsWith('https:') ? url : `https://${url}`try {const response = await fetch(formattedUrl)return { up: response.status < 400, url, lastChecked: now }} catch (error) {return { up: false, url, lastChecked: now }}}
Now let's update our post handler code to use this check:
import { statusCheck } from '../common/status'...publicApi.post('/sites/:url', async (ctx) => {const { url } = ctx.req.paramsconst siteData = await statusCheck(url)await sitesStore.set(url, siteData)// TODO Publish to site-added topicreturn ctx.res.json(siteData)})...
Ok so let's start Nitric and check out our current architecture:
nitric start
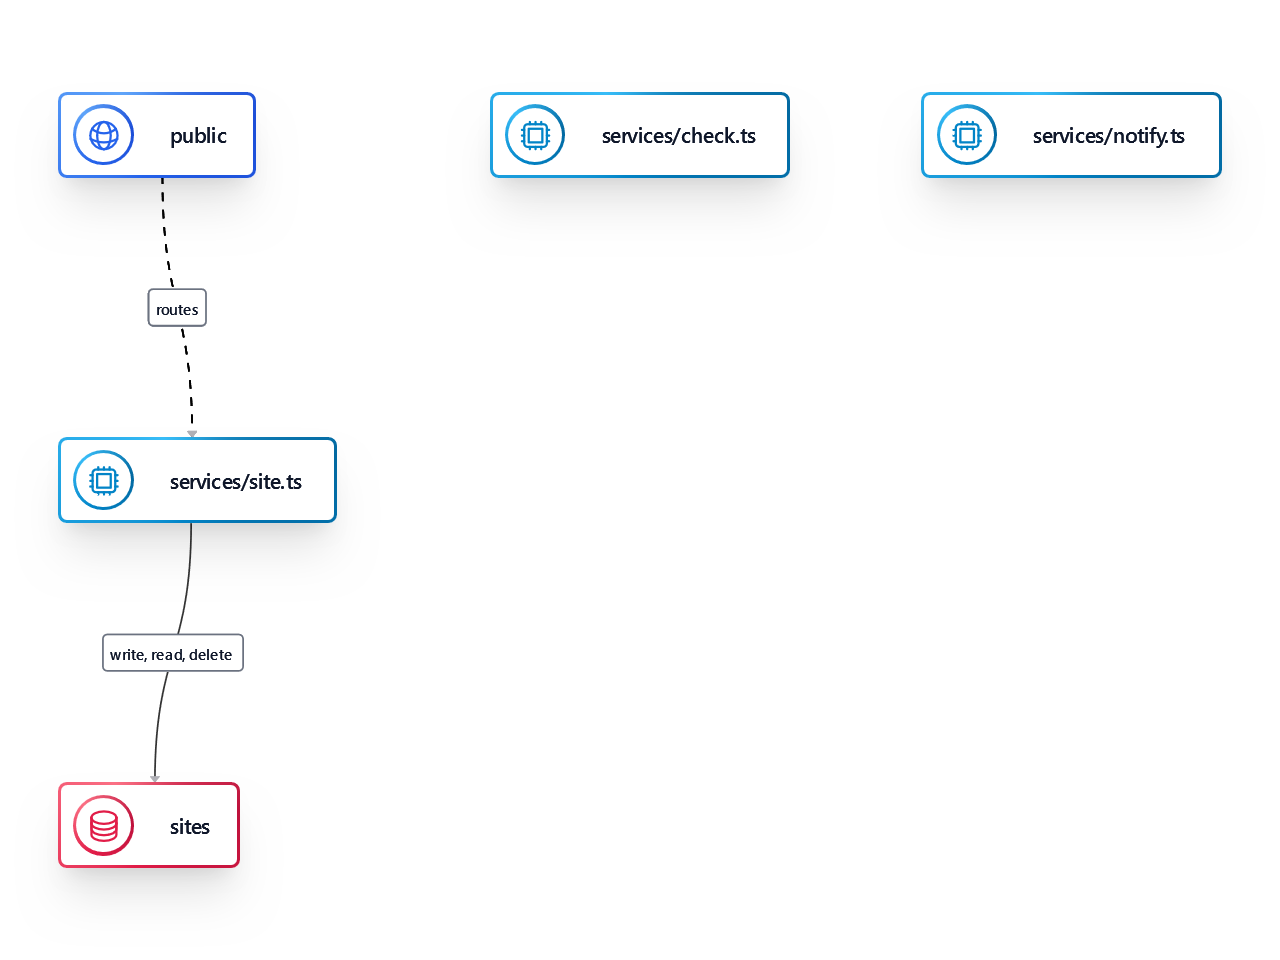
In the architecture page, you should see your public api and sites KV Store connected to your site service:
Let's try it! Navigate to the API Explorer and try calling the POST endpoint for /sites/{url} with google.com:
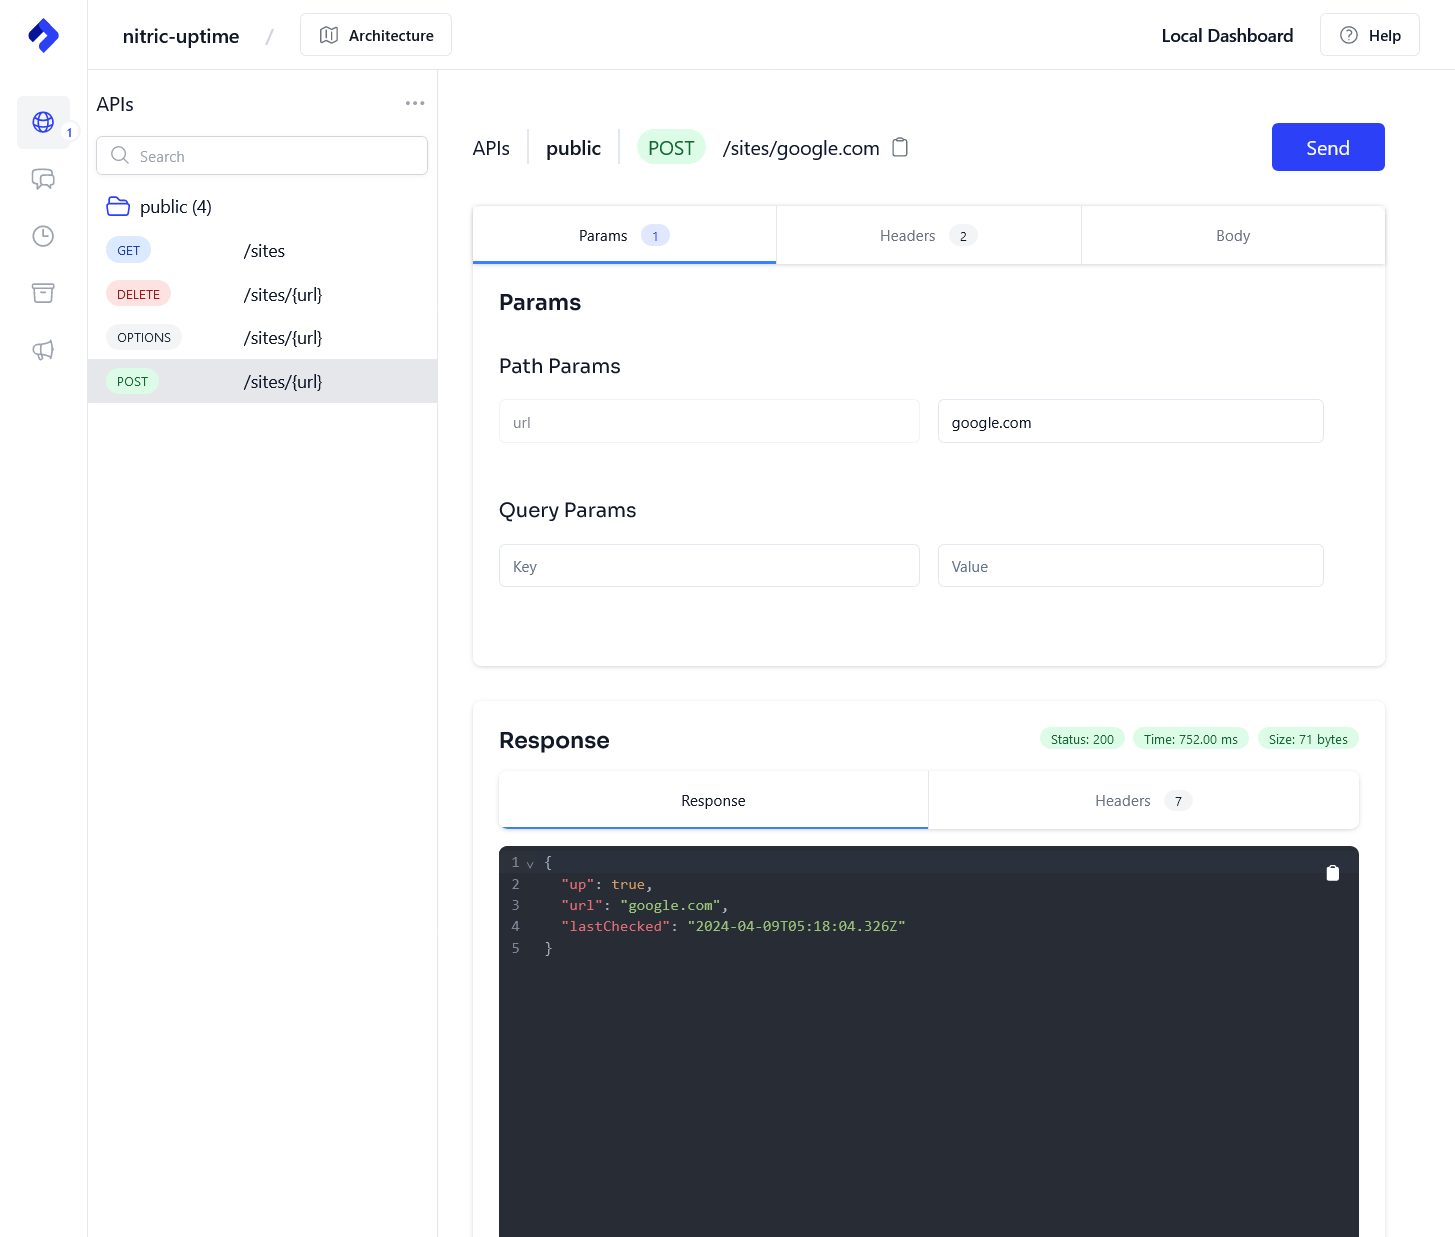
You should see a response similar to this (unless google is down 😲):
{"up": true,"url": "google.com","lastChecked": "2024-04-09T05:18:04.326Z"}
We can also test our GET and DELETE endpoints within the API Explorer. Ok onto our check service!
Check sites on a schedule
Navigate to the check.ts file and add a new schedule called site-check, let's schedule it to check every 1 minute.
Reuse the statusCheck function from earlier to check and update all sites:
import { schedule } from '@nitric/sdk'import { statusCheck } from '../common/status'import { sitesStore } from '../resources'schedule('site-check').every('1 minute', async () => {const sites = []for await (const key of sitesStore.keys()) {const site = await statusCheck(key)// TODO publish changes to site-update topicsites.push({key,...site,})}await Promise.all(sites.map(({ key, ...rest }) => sitesStore.set(key, rest)))})
To test using the local dashboard, you can trigger this schedule manually in the schedules screen or wait for it to be triggered at the rate defined.
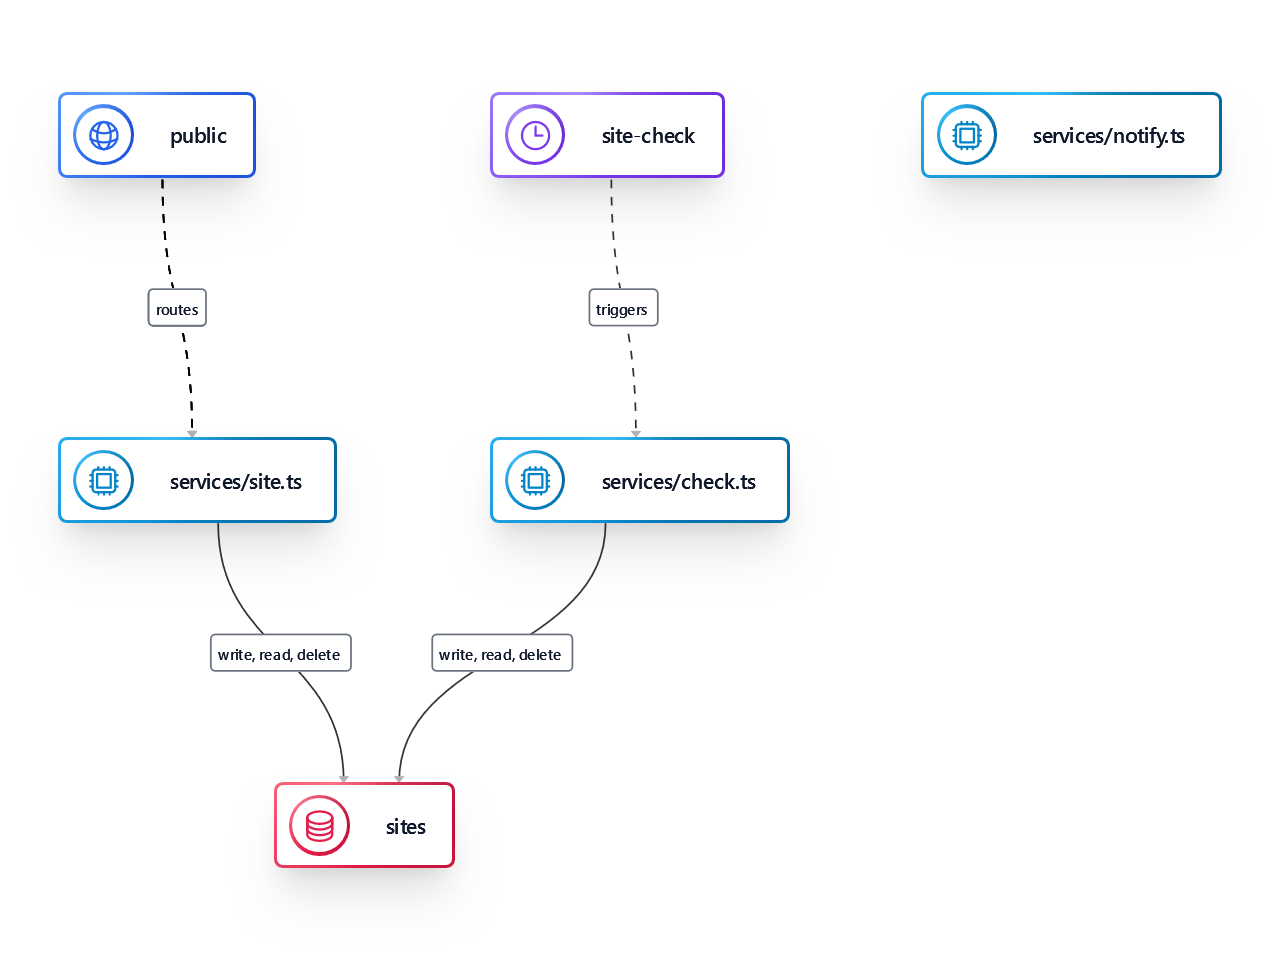
Back over in the architecture page, you should now see your site-check schedule and sites KV Store connected to your check service:
Notify with when a site goes down
An uptime monitoring system loses its effectiveness if it fails to alert you promptly when a website experiences downtime.
Let's create a service called notify that will use Nitric messages to publish events to your Discord server.
Start by creating new topics for the site-added, site-removed and site-update events:
import { api, kv, topic } from '@nitric/sdk'import { corsMiddleware } from '../common/cors'export interface Site {url: stringlastChecked: stringup: boolean}export const publicApi = api('public', {middleware: corsMiddleware,})export const sitesStore = kv<Site>('sites').allow('set', 'get', 'delete')export const siteAddedTopic = topic<Site>('site-added')export const siteRemovedTopic = topic<Pick<Site, 'url'>>('site-removed')export const siteUpdateTopic = topic<Site>('site-update')
Subscribe and handle all topic events
To send the events to Discord we need to set the DISCORD_WEBHOOK_URL environment variable. Start by creating a .env file from .env.example and add your Discord Websocket URL.
Add the following code that adds a subscriber to each topic with the relevant details for Discord to handle.
import { siteAddedTopic, siteRemovedTopic, siteUpdateTopic } from '../resources'const discordWebhook = process.env.DISCORD_WEBHOOK_URLsiteAddedTopic.subscribe(async (ctx) => {await fetch(discordWebhook, {method: 'POST',headers: {'Content-Type': 'application/json',},body: JSON.stringify({username: 'Nitric Uptime Monitor',content: `📢 **${ctx.req.json().url}** added to sites!`,}),})})siteRemovedTopic.subscribe(async (ctx) => {await fetch(discordWebhook, {method: 'POST',headers: {'Content-Type': 'application/json',},body: JSON.stringify({username: 'Nitric Uptime Monitor',content: `📢 **${ctx.req.json().url}** removed from sites!`,}),})})siteUpdateTopic.subscribe(async (ctx) => {const { up } = ctx.req.json()await fetch(discordWebhook, {method: 'POST',headers: {'Content-Type': 'application/json',},body: JSON.stringify({username: 'Nitric Uptime Monitor',content: up? `✅ **${ctx.req.json().url}** BACK UP!`: `🚨 **${ctx.req.json().url}** DOWN!`,}),})})
Publish the site added and removed topics
Within the site.ts service, import the siteAddedTopic and siteRemovedTopic topics and assign the publish permission to two new variables.
These will be used to call the publish method, which will send the payload to the topic subscriber.
import { statusCheck } from '../common/status'import {type Site,publicApi,sitesStore,siteAddedTopic,siteRemovedTopic,} from '../resources'const siteAddedTopicPublish = siteAddedTopic.allow('publish')const siteRemovedTopicPublish = siteRemovedTopic.allow('publish')...publicApi.post('/sites/:url', async (ctx) => {const { url } = ctx.req.paramsconst siteData = await statusCheck(url)await sitesStore.set(url, siteData)await siteAddedTopicPublish.publish(siteData)return ctx.res.json(siteData)})publicApi.delete('/sites/:url', async (ctx) => {const { url } = ctx.req.paramsawait sitesStore.delete(url)await siteRemovedTopicPublish.publish({url,})return ctx})...
Notify on site status check
Let's update our check service to notify site downtime changes via the site-update topic. We will add additional logic to only publish changes if the up status has actually changed.
import { schedule } from '@nitric/sdk'import { statusCheck } from '../common/status'import { siteUpdateTopic, sitesStore } from '../resources'const siteUpdateTopicPublish = siteUpdateTopic.allow('publish')schedule('site-check').every('1 minute', async () => {const sites = []for await (const key of sitesStore.keys()) {const existingSite = await sitesStore.get(key)const site = await statusCheck(key)// only publish changesif (existingSite.up !== site.up) {await siteUpdateTopicPublish.publish(site)}sites.push({key,...site,})}await Promise.all(sites.map(({ key, ...rest }) => sitesStore.set(key, rest)))})
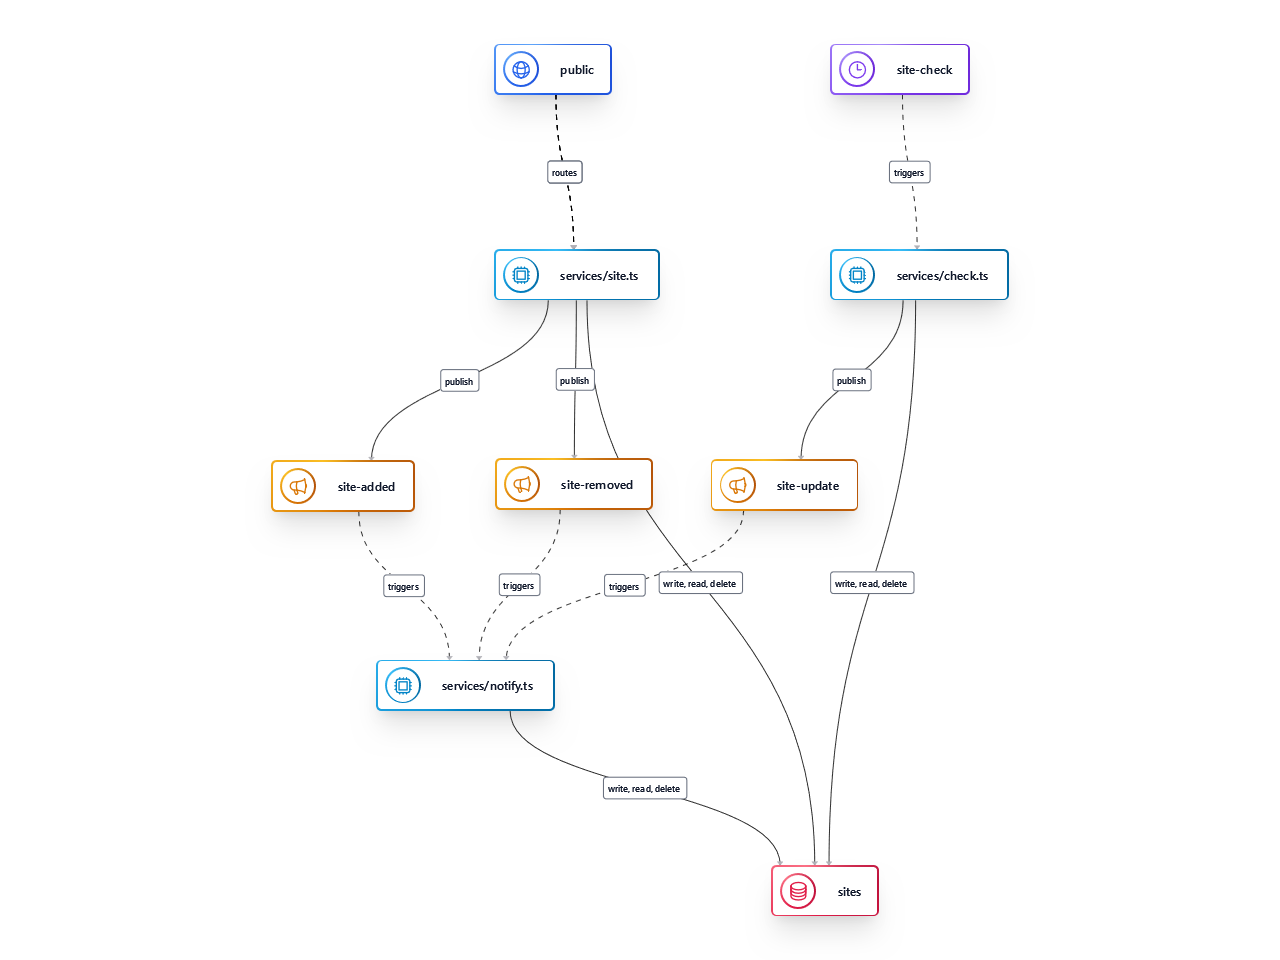
Our final architecture
If we go back to the architecture screen, we will see our final architecture:
Test via our frontend
We are ready to play with our new uptime monitoring app! Navigate to http://localhost:4321/ and add a site, you should see a Discord notification.
Deployment
As a next step, deploy your app to the cloud of your choice.
Conclusion
In this tutorial, we've:
- Built three services
site,notifyandcheck - Added a Key Value Store called
sitesto store and track the site status - Added a schedule which automatically checks all of the sites every minute
- Added three topics
site-added,site-removedandsite-updateto handle messaging between our system and Discord
Have feedback on this page?
Open GitHub Issue