Deployment
Nitric applications are decoupled from the underlying hosting provider, allowing you to develop your application locally and deploy it to your preferred cloud provider or another platform without these concerns bleeding into the application code.
You can read about why this separation is important on the why nitric page. This page will focus on the deployment process and how to configure your application for deployment.
If you're new to Nitric we recommend starting with the quickstart guide to get a feel for how Nitric works. You can return to this page later to learn more about the deployment process and how to customize it.
Providers
The plugins used to deploy your application to a specific target platform are called providers. Typically providers do one of two things:
- Deploy your application directly
- Generate Infrastructure-as-Code
The first option is useful for simplicity, where you deployment automation is handled directly by the provider plugin. The second option is useful for more complex deployments where you want to manage the infrastructure as code yourself.
For example, if you prefer to use Terraform and you rely on other Terraform tools for policy enforcement, or cost estimation, you can use or build a provider that generates Terraform code for you to deploy. This allows you to use Nitric's deployment automation and still leverage your existing Terraform workflows.
Alternatively, if you're looking for a simple deployment process, you can use or build a provider that deploys your application directly to your cloud provider of choice.
It's important to know which type of provider you're using, as the configuration options and deployment process will differ between them.
How Providers Work
Nitric providers are plugins that are responsible for deploying your application to a specific target platform. They can be used to deploy your application directly or to generate Infrastructure-as-Code for deployment.
Deployment
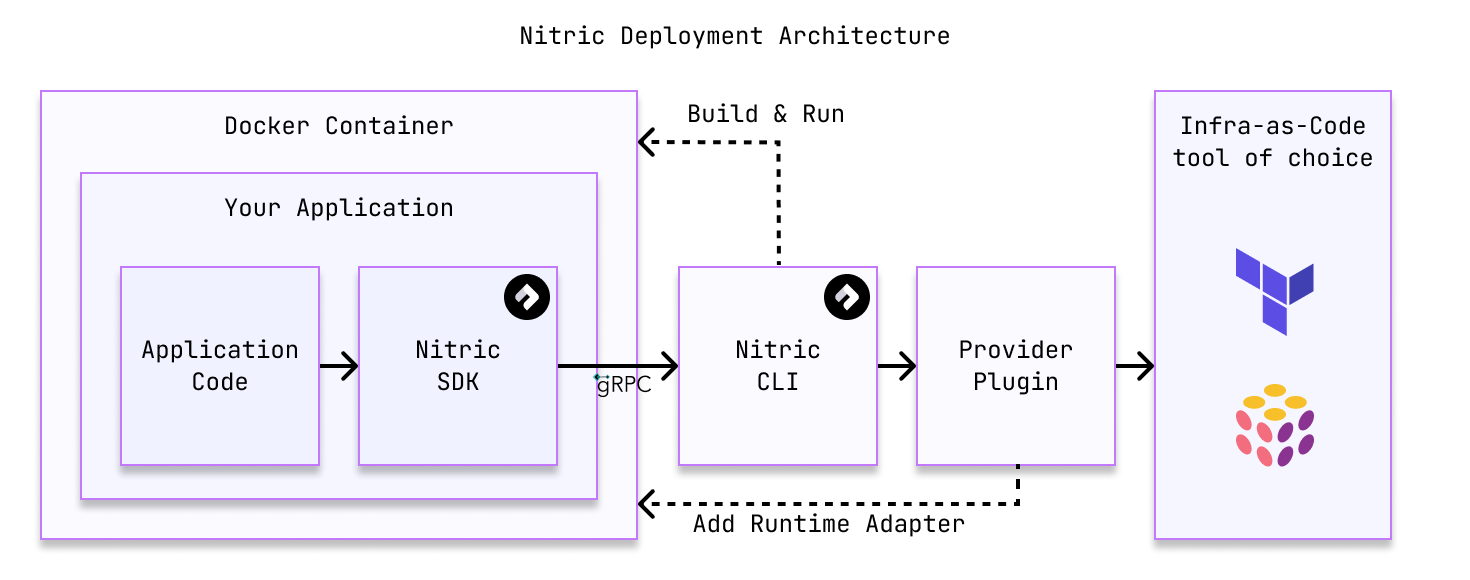
When you run nitric up, the provider plugin is responsible for deploying your application to the target platform. This typically involves the following steps:
- Build the application: The Nitric CLI will build the application using the configuration in the
nitric.yamlfile. This includes building container images for each service. - Run the application in resource collection mode: Nitric will run the application in a mode where it collects the resources used by the application. This is used to generate the graph of cloud resources required to run the application.
- Run the provider plugin: Nitric will run the provider plugin to deploy the application to the target platform. The provider plugin will use the resource graph from the previous step and service container images to determine the required cloud resources.
- Result: The provider plugin will either deploy the application to the target platform directly or generate IaC code for you to deploy. The deployment process will vary depending on the provider you're using.
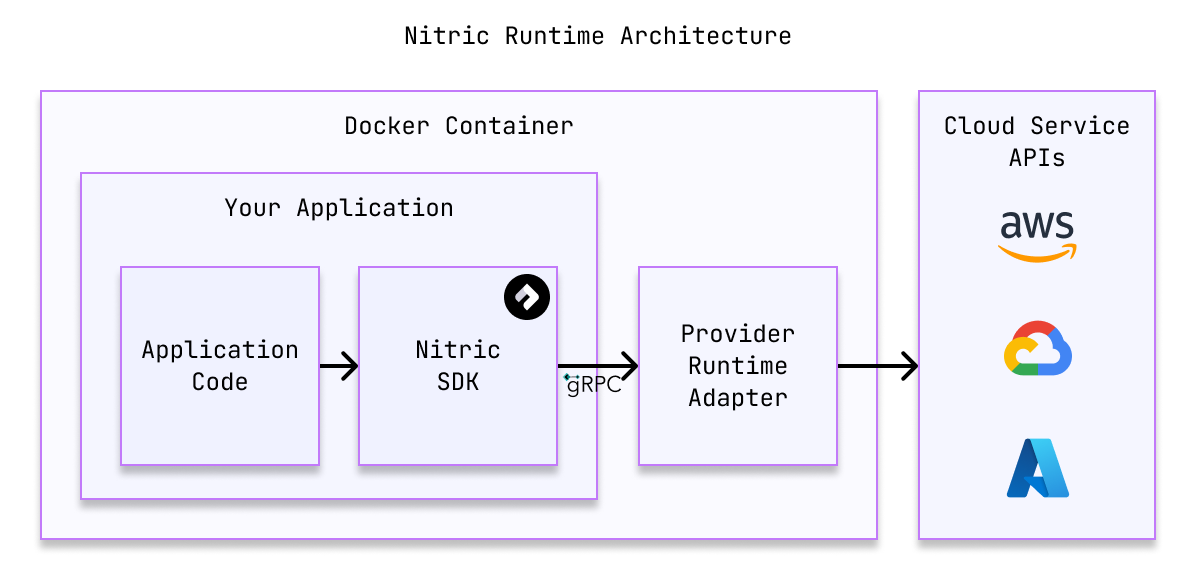
Runtime Adaptation
Provider plugins aren't just about deploying your application. They also provide a runtime adapter that allows your application to interact with cloud services in a cloud-agnostic way.
This allows code like bucket.file('file.txt').read() to work across platforms, even though the underlying services are different.
The runtime adapter acts as a Nitric protocol compliant server, accepting runtime calls made by a Nitric client (such as one of the Language SDKs), for example calling .read() on a file in a bucket. The runtime adapter translates these requests into cloud-specific API requests, typically abstracting common boilerplate such as locating SDK credentials for the cloud specific SDK.
This allows your services, functions, etc. to be built, tested and run independent of any specific cloud service. The end result is code that's faster to write, easier to test and remains portable between services and cloud providers.
It also significantly reduces the burden of writing project-specific Infrastructure as Code and ensures the application and its deployment automation don't drift apart as development continues.
Flexibility
The details above are true in the general case, but Nitric is extremely flexible.
For example, you could build a provider that doesn't use a runtime adapter and have your applications continue to use the cloud SDKs directly. This could be useful if you prefer not to abstract the cloud services or you want Nitric to just manage the deployment process.
Alternatively, you could build a provider that doesn't deploy your application at all, but instead generates a report of the resources required to run your application and their relationships. This could be useful for auditing or cost estimation. It could also be useful if you prefer more human control over the deployment process. At least you'll know a requirement is never missed.
Maybe you want to deploy the runtime adapter as a shared service, allowing multiple applications to share the same runtime adapter, reducing the size of individual container images.
The possibilities are endless, if you'd like to explore building a custom provider, check out the custom provider documentation or come chat with us on Discord.
Pre-built Providers
Nitric ships with five pre-built providers. The first three are direct deployment providers, and the last two are IaC providers.
Direct Deployment Providers
All of the direct deployment providers use Pulumi under the hood for their deployments, so Pulumi will need to be configured to persist your stack state and to run the deployment to the cloud of your choice.
If you're new to Nitric we recommend starting with one of the direct deployment providers for simplicity.
Infrastructure-as-Code Providers
All of the IaC providers generate Terraform code for deployment. This allows you to use Nitric's deployment automation and still leverage your existing Terraform workflows.
These providers are also a good starting point for customization when you have existing Terraform Modules or workflows you want to integrate with Nitric.
Custom Providers
If you have a specific cloud service, deployment workflow or tooling you want to use, you can build a custom provider. Custom providers allow you to target the host you prefer with your own tools and configuration.
You can also extend the existing providers to change which cloud services are used to fulfill the Nitric resource contracts, to add configuration options or to change the deployment process.
Deploying your application
This section focuses on how to configure your application for deployment and how to deploy it.
There are two primary commands for deploying your application with Nitric:
nitric up- Build the application and run the provider plugin to deploy itnitric down- Run the provider plugin to tear down the application
The nitric down is only available for direct deployment
providers. If you're using an IaC provider
you'll need to manage deployments and teardowns with your IaC tooling, such as
Terraform.
These commands are used to deploy stacks to different environments, such as development, testing, or production.
nitric up
The Nitric CLI command to perform builds/deployments is nitric up. This command performs the following steps:
- Build the application: Nitric will build the application using the configuration in the
nitric.yamlfile. This includes building container images for each service. - Run the application in resource collection mode: Nitric will run the application in a mode where it collects the resources used by the application. This is used to generate the graph of cloud resources required to run the application.
- Run the provider plugin: Nitric will run the provider plugin to deploy the application to the target platform. The provider plugin will use the resource graph and service container images to create the required cloud resources.
In the case of direct deployment providers, the provider plugin will use the embedded IaC tool of choice to deploy the application. For the official providers, this is Pulumi.
In the case of IaC providers, the provider plugin will generate IaC code for you using existing tools, such as the Terraform CLI. This code is typically output to a directory in your project, which you can then use to deploy the application with your existing CI/CD workflows. For example, you might commit the generated IaC code to a repository and use a CI/CD pipeline to deploy the application.
nitric down
The Nitric CLI command to tear down the application is nitric down. This command simply runs the provider plugin to tear down the application. This command is only available for direct deployment providers.
Stacks
Since an application can be deployed to multiple environments and cloud providers, Nitric uses stack files to identify these deployment targets. These files can be created by running the nitric stack new CLI command.
Stack files define the deployment plugin (provider), any additional configuration required by that plugin for it to be able to generate IaC or deploy your application. Most configuration options available in the stack files are specific to the provider you're using.
The common configuration option available in all stack files is the provider field, which specifies the provider plugin to use for the deployment. The standard format for specifying a provider is [namespace]/[provider]@[version]. The namespace for all standard providers is nitric. The provider is the name of the provider plugin, and the version is the version of the provider plugin to use.
There is another format for specifying providers as a container image docker://[image], which you can read about in the reference docs.
Here is a basic example, using the standard nitric AWS provider nitric/aws@1.1.0.
provider: nitric/aws@1.1.0region: us-east-1
Provider specific stack configuration, including advanced configuration options, can be viewed in the reference docs for each provider.
If you create a custom provider you're able define the options available in the stack files that target your provider.
Importing Existing Resources
Nitric allows you to import existing resources into your Nitric project. Currently, the AWS standard provider supports importing both buckets and secrets, while the Google Cloud standard provider supports importing secrets only. Importing resources via other providers is not yet supported.
Need to import another resource type or want support for additional providers? Chat with us on Discord or open an issue on GitHub.
How imports work
If you have existing resources that you would like to use in your Nitric project, you may be able to import them using the import section of your Nitric stack file. This section allows you to import existing resources and use them in your Nitric project. This indicates to the provider that you would like to use the existing resources in your Nitric project, rather than create a new one.
Imports are stack specific, meaning that you can import resources into a specific stack file, and they will only be available in that stack. Other stacks for the same project can either create or import those resources as needed.
What happens during nitric up
When deploying a stack that has imported resources, the resources will not be created. Instead, Nitric will use the referenced resources from the stack file. If the resources can't be located or accessed, the deployment will fail.
Nitric attempts to make the minimum changes needed to the imported resources to make them compatible with the Nitric project. Since Nitric standard providers use custom tags for resource location, the resources will have these tags added during deployment. Additionally, Nitric will add the necessary permissions to the resources to allow the Nitric project to access them, just like it would with resources it creates.
The tags created are extremely unlikely to conflict with existing tags. For example, with the AWS standard provider, an S3 bucket will have these two tags created x-nitric-{project}-{stack}-{randomId}-type and x-nitric-{project}-{stack}-{randomId}-name. The type tag identifies the type of Nitric resource, and the name tag is the name of the resource in the Nitric project.
What happens during nitric down
When tearing down a stack that has imported resources, the resources will not be deleted. This is because the resources were not created by Nitric, so for safety they're always set to 'retainOnDelete'. If you would like to delete the resources, you will need to do so manually or using whichever tools created those resources initially.
The tags added to the resources during deployment may not be removed during the nitric down process. If you intend to redeploy the stack with an updated import, you may need to remove these tags manually.
CI/CD
Deploying Nitric applications with CI/CD automation tools is simple. Explore the guides below for examples with common CI/CD tools:
Have feedback on this page?
Open GitHub Issue