TLDR; You can check the final example code here
A big part of platform engineering is the ability to create consistent automated deployments. This usually comes in the form of productizing infrastructure. You're probably familiar with existing products like Crossplane that exemplify this by providing a way for platform engineers to construct APIs that developers can consume in order to achieve self-service infrastructure.
IaC from APIs
When building Nitric we wanted to incorporate this idea of self-service infrastructure into the framework. To accomplish this we developed a plugin interface using gRPC to decouple the cloud implementations from the infrastructure specifications. This interface receives cloud infrastructure specifications collected from Nitric application code. From this, we can deploy cloud infrastructure using the Pulumi automation API. Pulumi provides many examples of using the automation API to build and deploy APIs that can be used to achieve self-service infrastructure.
When building Nitric providers that produce Terraform rather than deploying directly to the cloud, the logical choice was using CDK for Terraform (cdktf). However, no guides or documentation are provided to achieve this. On its face it appears straightforward, write cdktf code behind an API interface and at the end of your code call app.synth(). This would output a Terraform stack and send it back to the client in some way. Unfortunately, there are many challenges that need to be addressed to achieve this, which I'll be covering in this blog.
For simplicity, we'll look at building a basic HTTP API in TypeScript that outputs a Terraform stack and sends the resulting output as a zip file back to the client. While the technologies used in this example are different, the same principles apply to the Nitric Terraform providers.
Installing dependencies
To get started, let's make sure we've got everything we need installed:
- Node.js (cdktf uses JSII under the hood, so this is a dependency no matter what language you choose)
- Terraform
- CDKTF CLI
Scaffolding the project
cdktf provides a way to scaffold a project with most of what we need to start.
Create a new directory for your project and run cdktf init --template=typescript.
When prompted for providers select aws as that's what we'll use in upcoming code examples.
Once all the prompts are answered let's get some extra dependencies out of the way.
npm i express short-uuid archivernpm i --save-dev @types/express @types/archiver
Wrapping in an API
Let's take a look at the main.ts file in our generated template.
import { Construct } from 'constructs'import { App, TerraformStack } from 'cdktf'class MyStack extends TerraformStack {constructor(scope: Construct, id: string) {super(scope, id)// define resources here}}const app = new App()new MyStack(app, 'example')app.synth()
This structure assumes we'll generate our Terraform stack inline using the cdktf CLI. Instead, we'll wrap the application creation and synthesis in a simple express route.
import { Construct } from 'constructs'import { App, TerraformStack } from 'cdktf'import express from 'express'const PORT = process.env.PORT || 3000const server = express()server.use(express.json())class MyStack extends TerraformStack {constructor(scope: Construct, id: string) {super(scope, id)// define resources here}}server.post('/generate', async (req, res) => {const deploymentSpec = req.bodyconsole.log('deploying', deploymentSpec)const app = new App()new MyStack(app, 'example')app.synth()res.send('Generated')})server.listen(PORT, () => {console.log('Server is running on port', PORT)})
This app will no longer work with the cdktf CLI so we'll disable the app part our our cdktf.json config
{"language": "typescript","app": "echo no op","projectId": "bcdaae49-8acc-4de1-9b3d-da0dbd18385e","sendCrashReports": "false","terraformProviders": [],"terraformModules": [],"context": {}}
Now that we've wrapped it in a server, let's test it. Start by adding a dev script to package.json so we can run our server:
"scripts": {"dev": "ts-node main.ts"}
Next, we can start our server by running npm run dev and testing it with:
curl -X POST -H "Content-Type: application/json" -d '{}' http://localhost:3000/generate
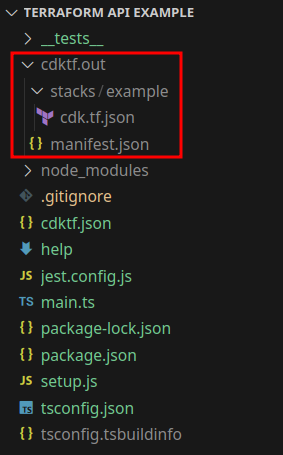
We should now see that our stack has been written into our project:

Time for a quick celebration:

Defining our request
Now that we have a working server we need to modify it so the client can make requests with their infrastructure specification.
We'll start by defining a request specification in TypeScript that our stack will take as an argument.
export interface StackRequest {name: stringbuckets: string[]}
For the sake of simplicity we'll allow our client to request a specification that will deploy a number of buckets.
Altogether our app should look something like this:
import { Construct } from 'constructs'import { App, TerraformStack } from 'cdktf'import express from 'express'const PORT = process.env.PORT || 3000const server = express()server.use(express.json())export interface StackRequest {name: stringbuckets: string[]}class MyStack extends TerraformStack {constructor(scope: Construct, id: string, req: StackRequest) {super(scope, id)// define resources hereconsole.log('deploying buckets', req.buckets)}}server.post('/generate', async (req, res) => {const deploymentSpec = req.body as StackRequestconsole.log('deploying', deploymentSpec)const app = new App()new MyStack(app, deploymentSpec.name, deploymentSpec)app.synth()res.status(200).send('Generated')})server.listen(PORT, () => {console.log('Server is running on port', PORT)})
We can quickly test this by running the following command:
curl -X POST -H "Content-Type: application/json" -d '{ "name": "my-stack", "buckets": ["test"] }' http://localhost:3000/generate
Now we can see that our provided stack-name is being used in the output.
Sending back the result
Next, we want to return a response that the client can use. To do this we'll zip up the generated Terraform and send a file response to the client.
If we're running this as a common server it's possible that stack outputs could conflict with each other. To handle this, each request will generate a unique ID and set the Terraform output to that location. Then we'll take that output, zip it up, and return it to the client.
First import the archiver, fs, and short-uuid libraries, then add a function for archiving the Terraform output:
import fs from 'fs';import archiver from 'archiver';import short from `short-uuid`;
Next we'll add a small method to help zip the Terraform output:
// Compresses the provided directory into a zip filefunction zipDirectory(sourceDir: string, outPath: string): Promise<string> {return new Promise((resolve, reject) => {const output = fs.createWriteStream(outPath)const archive = archiver('zip', { zlib: { level: 9 } })output.on('close', () => resolve(outPath))archive.on('error', (err) => reject(err))archive.pipe(output)archive.directory(sourceDir, false)archive.finalize()})}
Finally, we'll update our generated endpoint to return the resulting zip archive:
server.post('/generate', async (req, res) => {const deploymentSpec = req.body // Assuming body structure is validatedconsole.log('Deploying', deploymentSpec)const uniqueId = short.generate()const outputDir = `./${uniqueId}`// Generate Terraform configurationconst app = new App({outdir: outputDir,})new MyStack(app, deploymentSpec.name, deploymentSpec)app.synth()// Zip the generated Terraform configurationconst zipPath = await zipDirectory(`${outputDir}/stacks/${deploymentSpec.name}`,`${outputDir}.zip`,)// Send the zip file as a responseres.download(zipPath, async (err) => {if (err) {console.error('Error sending the zip file:', err)res.status(500).send('Error generating Terraform configuration')}// cleanup generated output and zip fileawait fs.promises.rmdir(outputDir, { recursive: true })await fs.promises.rm(zipPath)})})
We can test this by running:
curl -X POST -H "Content-Type: application/json" -d '{ "name": "my-stack", "buckets": ["test"] }' http://localhost:3000/generate > my-stack.zip
The response should be a file called my-stack.zip containing the generated Terraform from your request.
Adding some infrastructure
Now let's add some deployment code, for each requested bucket we'll add one AWS S3 bucket to the stack.
First off we'll import S3 buckets and the base provider from the cdktf aws provider:
import { S3Bucket } from '@cdktf/provider-aws/lib/s3-bucket'
Then we'll update our stack like this:
class MyStack extends TerraformStack {constructor(scope: Construct, id: string, req: StackRequest) {super(scope, id)// Allow the region to be configured on applyconst region = new TerraformVariable(this, 'region', {type: 'string',description: 'The AWS region to deploy the stack to',})// Configure the aws providernew AwsProvider(this, 'aws', {region: region.stringValue,})req.buckets.forEach((bucketName) => {// Deploy an aws s3 bucketnew S3Bucket(this, bucketName, {bucket: bucketName,})})}}
We can test this again by running:
curl -X POST -H "Content-Type: application/json" -d '{ "name": "my-stack", "buckets": ["test", "test1"] }' http://localhost:3000/generate > my-stack.zip
We can then unzip the output by running:
unzip my-stack -d ./my-stack
This will output our Terraform into a new directory ./mystack we can then init and apply our stack to see the plan of what our API produced.
cd ./my-stackterraform initterraform apply
That's it! You've written an API that produces executable Terraform output as a product, that can be deployed and reused.
Altogether your app should look something like this:
Full Code
import { Construct } from 'constructs'import { App, TerraformStack, TerraformVariable } from 'cdktf'import express from 'express'import short from 'short-uuid'import fs from 'fs'import archiver from 'archiver'import { S3Bucket } from '@cdktf/provider-aws/lib/s3-bucket'import { AwsProvider } from '@cdktf/provider-aws/lib/provider'const PORT = process.env.PORT || 3000const server = express()server.use(express.json())export interface StackRequest {name: stringbuckets: string[]region: string}class MyStack extends TerraformStack {constructor(scope: Construct, id: string, req: StackRequest) {super(scope, id)const region = new TerraformVariable(this, 'region', {type: 'string',description: 'The AWS region to deploy the stack to',})// configure the aws providernew AwsProvider(this, 'aws', {region: region.stringValue,})req.buckets.forEach((bucketName) => {// deploy an aws s3 bucketnew S3Bucket(this, bucketName, {bucket: bucketName,})})// define resources hereconsole.log('deploying buckets', req.buckets)}}function zipDirectory(sourceDir: string, outPath: string): Promise<string> {return new Promise((resolve, reject) => {const output = fs.createWriteStream(outPath)const archive = archiver('zip', { zlib: { level: 9 } })output.on('close', () => resolve(outPath))archive.on('error', (err) => reject(err))archive.pipe(output)archive.directory(sourceDir, false)archive.finalize()})}server.post('/generate', async (req, res) => {const deploymentSpec = req.body // Assuming body structure is validatedconsole.log('Deploying', deploymentSpec)const uniqueId = short.generate()const outputDir = `./${uniqueId}`// Generate Terraform configurationconst app = new App({outdir: outputDir,})new MyStack(app, deploymentSpec.name, deploymentSpec)app.synth()// Zip the generated Terraform configurationconst zipPath = await zipDirectory(`${outputDir}/stacks/${deploymentSpec.name}`,`${outputDir}.zip`,)// Send the zip file as a responseres.download(zipPath, async (err) => {if (err) {console.error('Error sending the zip file:', err)res.status(500).send('Error generating Terraform configuration')}// cleanup generated output and zip fileawait fs.promises.rmdir(outputDir, { recursive: true })await fs.promises.rm(zipPath)})})server.listen(PORT, () => {console.log('Server is running on port', PORT)})
This API serves as a good foundation but has a lot of room for expansion. You could implement alternative servers that use the same deployment specification but deploy to different or multiple clouds.
Bonus: You can also use HCL if preferred
Many existing sets of modules are already written in HCL and CDKTF provides a mechanism for generating language bindings directly from HCL sources. If you'd prefer to write your modules in HCL instead of code, it would allow you to reuse existing Terraform modules for your API.
You can check out their docs for how to generate these bindings.
This is how the modules for the Nitric Terraform providers are written. For inspiration, take a look at the AWS Implementation.
A production example
If you're looking to see how this can apply in a production context you can check out how we implement this in Nitric Nitric AWS TF Provider, this repository demonstrates how we take our HCL modules to create language bindings and then serve them as a gRPC server to be called by the Nitric CLI for deployments.
You can find the complete example project here.
Checkout the latest posts

Why I joined Nitric
Why I left the corporate world to join Nitric

Build Azure Infrastructure Using AI and Terraform
Learn how to leverage AI and Terraform to build and deploy Azure infrastructure directly from your application code with Nitric.

GenAI Made Terraform More Relevant Than Ever
Infrastructure as Code is more alive than ever, but it is no longer something teams should write line by line.
Get the most out of Nitric
Ship your first app faster with Next-gen infrastructure automation


